Straight out of the box 3D print process for my Ender 5 Pro (along with many other printers) is to select and print a gcode file from the printer’s micro-SD card. This means that after every modification and re-slice, the gcode file has to be copied from computer to micro-SD card, the card plugged into the printer and the model to print selected via the printer’s control panel.
As a process this has a few disadvantages:
- In my setup the printer is downstairs in my workshop but my design computer is upstairs, so I’m continuously (… well, quite regularly) running up and down stairs with SD cards,
- Selecting the print using the Ender 5 Pro’s control wheel sometimes starts the wrong print. The Ender’s control wheel is a rotary encoder with push button. The selection process is to turn the wheel until the correct file is highlighed, then push the wheel to select the file and start the print. The trouble is that sometimes the wheel turns slightly when it’s being pushed resulting in the wrong file being selected and printed. Now I could fix this by only ever having a single file on the card, but that’s a level of card management I really can’t be bothered with.
- Long filenames don’t display fully on the Ender 5 screen, so once again the wrong file sometimes gets selected.
Monitoring print progress also means physically getting to the printer, so even more trips up and down the stairs. After the best part of two years doing it the hard way, I finally decided it was time to look into a more connected-up way to manage the printer. Surely there has to be a better way …
Process Improvement
Well actually there is more than one. Possibly the simplest (based on the reviews I’ve seen) is the Creality Wi-Fi Box. However, there did seem to be a few issues using these reported by some users, and after my not-too-positive experience with the Creality Slicer I’m not too sure about relying on the Creality Cloud app.
So, as a long-time Raspberry Pi user, I deciced to go with the open source RPi option – OctoPi (the Raspberry Pi version of OctoPrint). Getting this installed and set up is pretty easy: hardware-wise all that’s needed is a Raspberry Pi with PSU, a micro-SD card and a USB cable. OctoPrint recommends the Raspberry Pi 3B, 3B+, 4B or Zero 2 – I used a Pi 3B as I had a couple of spare ones gathering dust waiting for the right project (sad, isn’t it?).
To get the software loaded onto the Raspberry Pi the steps required were:
- Download the OctoPi image from octoprint.org or the GitHub repository.
- Flash the micro-SD card with the OctoPi image: this can be done with the Raspberry Pi imager, but I used Balena Etcher as I’ve used it for other projects.
Setting Up OctoPi
With the OctoPi image burned onto the micro-SD card the first step is setting up the connection to the wi-fi network. This is a bit of a Linux-type step, as it’s not done through a nice simple user interface (but it is easy):
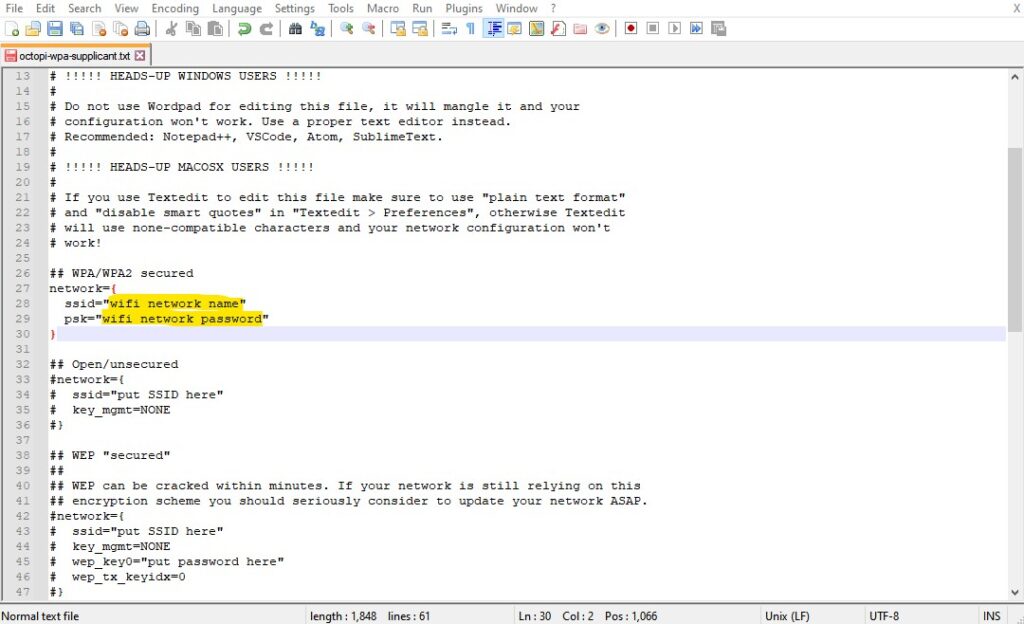
With the micro-SD card still connected to the computer, navigate to the card’s root directory and find the file called “octopi-wpa-supplicant.txt”. Open it with Notepad/Notepad++ or other text editor (there are a couple of warnings at the start of the file about other text editors). I used Notepad++ as it’s one that I’m familiar with.
Uncomment the section for the type of wi-fi network you have by removing the “#” characters at the start of the lines and filling in the network name and password in the ssid and psk fields (highlighted below for my WPA network):
In the same file set the country by scrolling towards the end of the file, commenting out the “country=GB” line if you’re not in the UK and either uncommenting one of the ones already in the file or adding a new one according to the Wikipedia page given in the comments (see the image below):

Save the file back to the micro-SD card.
Plug the SD card into the RPi and power it up: it should now connect to the wi-fi network.
For security the default password for SSH access should be changed. This is done by opening a terminal on the computer (CMD in Windows), then typing “ssh pi@octopi.local” and pressing Enter. When asked if you’re sure you want to connect respond “yes“, and when asked for the password type “raspberry” and press Enter.
Raspi-Config
At this point you are logged in to the RPi as the pi user. Changing the password is done in the Raspberry Pi Software Configuration Tool which is run by typing “sudo raspi-config” (and pressing Enter). This absolutely stunning retro interface is what appears on the screen:

Selecting the first option gives the next level of menu (below):

The third option on the list is to change the password. Select this, then set the password to something a bit more secure than the default. You don’t have to log on to the RPi like this very often (mercifully!), if at all, but at least now nobody else can!
That’s all for the basic OctoPi setup. After that power the RPi down, connect it to the 3D printer with a USB cable then power up printer and RPi.
OctoPrint Configuration
Now the basic OctoPrint configuration can be done through the OctoPrint web interface. Opening a browser and entering the url: “http://octopi.local” brings up the OctoPrint UI. OctoPrint has a setup wizard that runs the first time it’s used – it is fairly self explanatory and not difficult to work through. Once that’s done the user interface looks like this:

Whenever the printer and RPi are powered up, connect to the printer using the connection panel at the top left of the screen (I always use the AUTO settings) and everything’s good to go.
Gcode files can be uploaded and printed using the controls in the panel on the left side of the interface. During a print it’s possible to see print progress (upper left) and temperatures (graph, top right) from the comfort of your desk. The screen grab below was taken during a print:

Rather than taking apart the printer to try to install the RPi inside the control unit, or having a bare Raspberry Pi sitting next to the printer, I boxed my RPi using a sleeve case downloaded from Thingiverse and printed with the same blue filament used for my other printer mods.
So that’s it – remote control of the 3D printer from my design computer. Taking this a stage further it’s possible to add a webcam to visually monitor print progress in real time. One for a future post!
One thought on “Improving the 3D Print Process”