I’m one of those sad photographers who always uses a lens hood. I have one for every lens I own, and whenever I’m taking pictures the hood is always on the lens the right way round, unless I’m actually wanting to inject a bit of flare into an image. I’m always amazed when I see people with very expensive pieces of glass on their cameras taking shots with the hood apparently permanently reversed. Why buy good glass and then lose all that contrast and catch a load of flare, when it’s so simple to just turn the hood round? But I digress …
The time when the ‘use a lens hood’ rule falls down for me is when I’m using my 100mm filters, as my Sioti filter system, along with most other square 100mm systems, doesn’t have a lens hood included in the lineup. Naturally Lee have one to fit their filter system, and as you might expect their design is pretty smart. It’s a bellows unit, making it very adjustable; the way it fits on to the filter holder is clever, and the hood is rotatable, so it can stay correctly aligned when the filters have to be at an angle. I’d happily buy one, but the price is a bit on the eye-watering side for someone on my budget.
There are a load of matte box type hoods out there, mostly used in video rigs, but most of them require rail/rod supports to run on, making them larger and less portable than I’d like.
So, as ever, the alternative is to make my own. I’ve had this on my never-ending build list for quite a while, and when I was doing some reseach a while back I found what I think is the best self-build matte box type solution described in this YouTube video. While it’s not exactly what I was looking for, it was close enough to be adapted into what I want and was going to be the basis of this project.
However, a recent development at photobuilds HQ (my garage) is that I’ve bought a 3D printer. This was in part prompted by the length of time I spent filing pipe fittings for my pipe light, but also because it should both save a lot of time looking for parts that can be ‘adapted’ and help create projects that don’t look quite so hacked together. Putting that theory to the test, this project is my first attempt at a design for 3D printing and at a build that only uses 3D printed parts, apart from a few nuts, bolts and the like.
Design
So to the design, which I admit does reference the Lee unit. I like the notion of a ring that fits onto the filter holder, as it makes it easy to allow the hood to rotate.
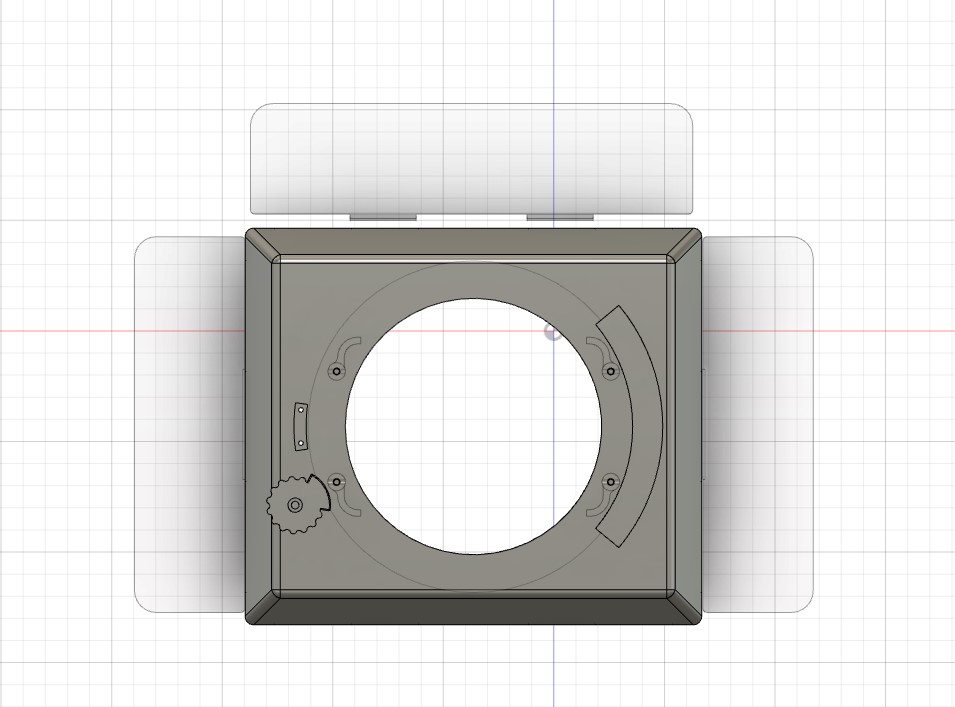
My design is in two basic parts: the first being the ring that fits on to my Sioti filter holder: this is held in place by four simple spring clips.
The second part is the actual hood. Being fairly new to 3D printing, I’m not sure that my design or printing skills are up to the job of making a bellows, so my hood is based on a more conventional tapered hood with folding flags (like a lot of other matte box type hoods). In total the hood consists of eight components: the actual hood body, two long flags (top and bottom), two shorter flags (sides), and three parts to clip it to the ring and allow it to be rotated.
All parts were drawn up from scratch in Fusion 360. Working out how to drive this software has been a fairly steep learning curve over the last few weeks, so the drawings may lack a bit of finesse, but the exported .stl files are linked here. There are nine files in the zip archive:
- Filter ring
- Swing clip – needs to be printed four times
- Hood body
- Long flag (50mm)
- Long flag (40mm)
- Short flag – needs to be printed twice
- Stepped arc mount
- Small arc stop
- Locking wheel
The original long flag was 40mm wide, but I decided to expand it slightly to 50mm across. For the assembled version of the hood I’ve used the 50mm flag at the top, as that’s where I’m likely to need more shading. The bottom flag is the 40mm version.
Printing
The .stl files were loaded into Ultimaker Cura and sliced to create the gcode files for printing: most were printed using black eSun PLA+ filament, although the wheel and locking tabs were printed with Technology Outlet blue PLA filament.
The hood body is a bit tight on size for my Creality Ender 5 Pro print surface as it’s about 206mm across on the longer side. I had to slightly modify the Ender 5 profile in Cura (expanding the X dimension from 220mm to 230mm) to get it to slice, but after that it printed with no issues.
Most of the parts were sliced with default settings in Cura, the exceptions being:
- the mounting ring, which has a wall thickness increased to 1mm, and infill density of 30% with an infill pattern of octet,
- the wheel, which was printed with a layer thickness of 0.12mm and support generated with the ‘touching the build plate’ option.
Additional parts
There are a few additional parts needed to put the hood together:
M3, M2.5 and M2 bolts – the threaded holes on the filter ring and the longer stepped mount part were designed with threaded M3 holes, but with shrinkage in printing they’re a good fit for M2.5 bolts. Similarly the shorter plain mount part was designed with M2.5 holes and is fitted with M2 bolts. The locking wheel has a 3.5mm hole to take an M3 bolt. A few M2.5 and M3 washers were also used.
Springs: the swing clips that attach the filter holder to the ring each need a spring. These have to be short and about 3mm internal diameter. You can buy suitable springs with a bit of searching, but I found that the springs from a couple of retractable pens work fine when they’re cut in half. The bolt holding on the locking wheel also has a section of spring: this time salvaged from an old pen torch.
Finally the flags are fixed in place with 22 gauge steel wire – this has a diameter of about 0.65mm, which is a reasonable fit through the holes in the hood and flags. These parts were designed with 1mm holes, but once again there is some shrinkage during printing.
Assembly
Assembly is mostly pretty simple. For each of the four swing tabs on the ring I used a 12mm M2.5 bolt, added a washer, section of spring and printed tab and screwed it into the threaded post. The tabs can be lifted and twisted out of the way when the ring is being fitted to the filter holder, but click into place when they are turned to lock the filter holder in place.
Turning to the actual hood, the stepped mount is screwed in place using three 6mm M2.5 bolts. The small arc stop is screwed in place using a pair of 6mm M2 bolts. I added a bit of 5 minute epoxy before screwing this into place since a) the M2 bolts are pretty small and their threads very fine, and b) old habits die hard. I’m not sure I’m ready to do a complete build without using any of my old materials just yet!
The locking wheel is attached to the hood using a 15mm M3 bolt with washers and lock nut. The hole for mounting this on the hood body was positioned and drilled by hand to ensure it’s a good fit. I didn’t want to take a guess at how much shrinkage to allow for to get it in the right place, since I haven’t had much practice at this yet! A washer and section of compression spring were added between the hood and the washer and lock nut inside the hood – this combination should keep the wheel mounting under tension.
The flags have a length of 22 gauge steel wire threaded thrrough them and the corresponding holes in the hood. Once they were in place the wire was cut off with about 5 or 6mm protruding at each end and this was bent back round to avoid having a pointy end sticking out.
Getting the wires to thread is a bit fiddly and takes a little preparation. I opened up both ends of the holes on the hood and flages with a 0.7mm drill in a pin chuck to clean away any surplus plastic, then ran a piece of the 22 gauge wire through each of the holes a few times until it went through smoothly. With that preparation done, threading the wires through hood and flags wasn’t too difficult, although the first transition from hood to flag on each side was a little tricky until the alignment of the parts was right.
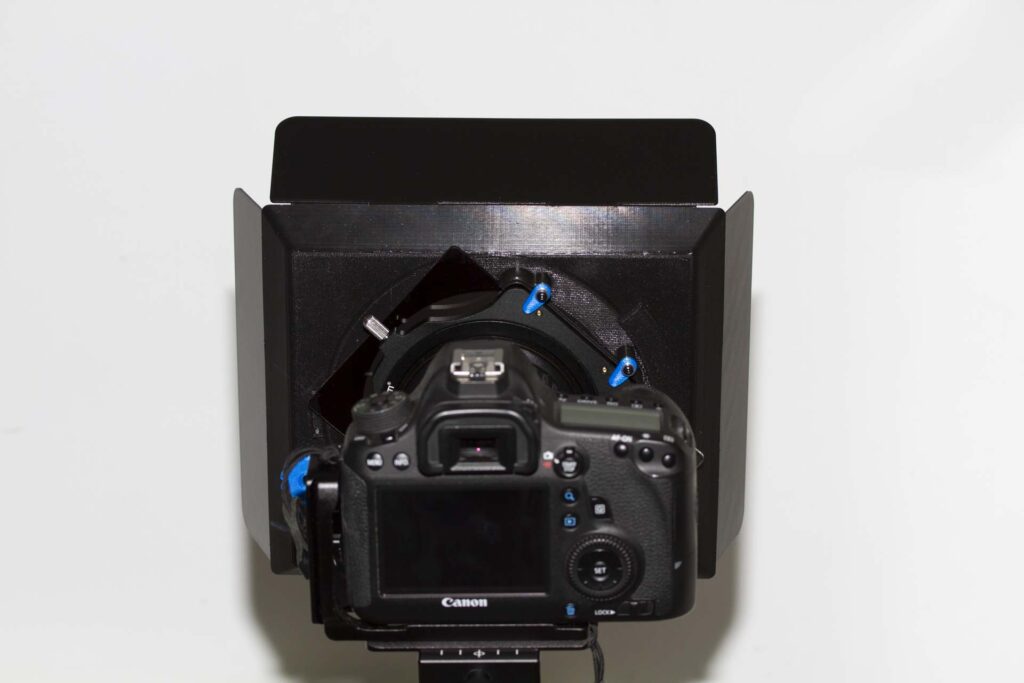
Finished Product
Attaching the hood to the camera is easy when the camera is on a tripod, which it’s likely to be when I’m using the hood. Just fit the ring over the filter holder and turn the clips until they click into place.
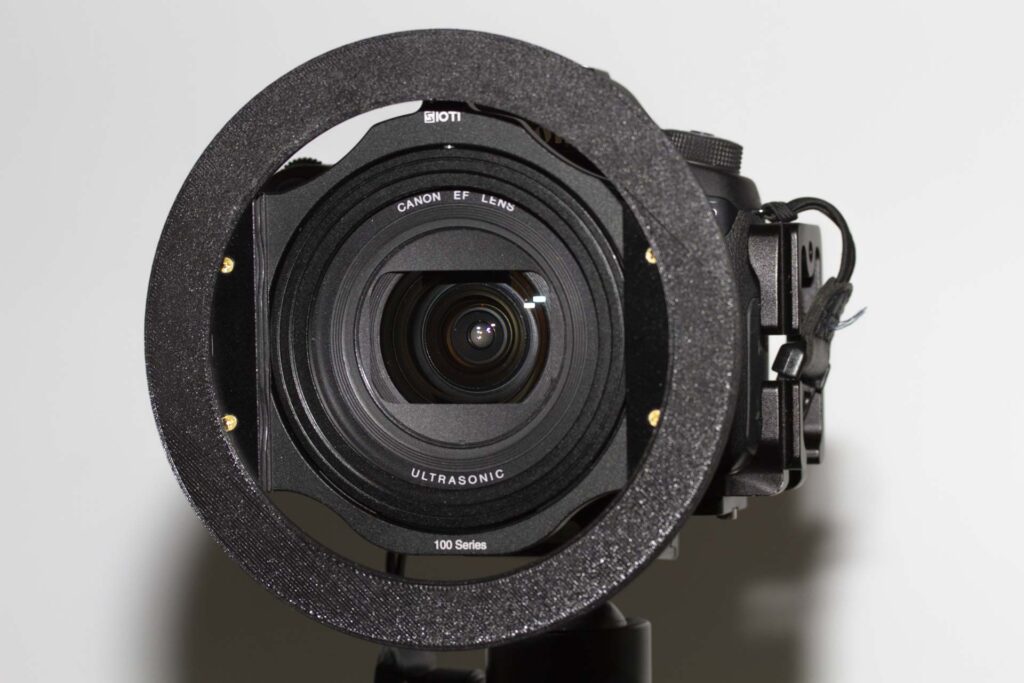
Next slide the hood onto the ring and turn the blue wheel to lock it in place.
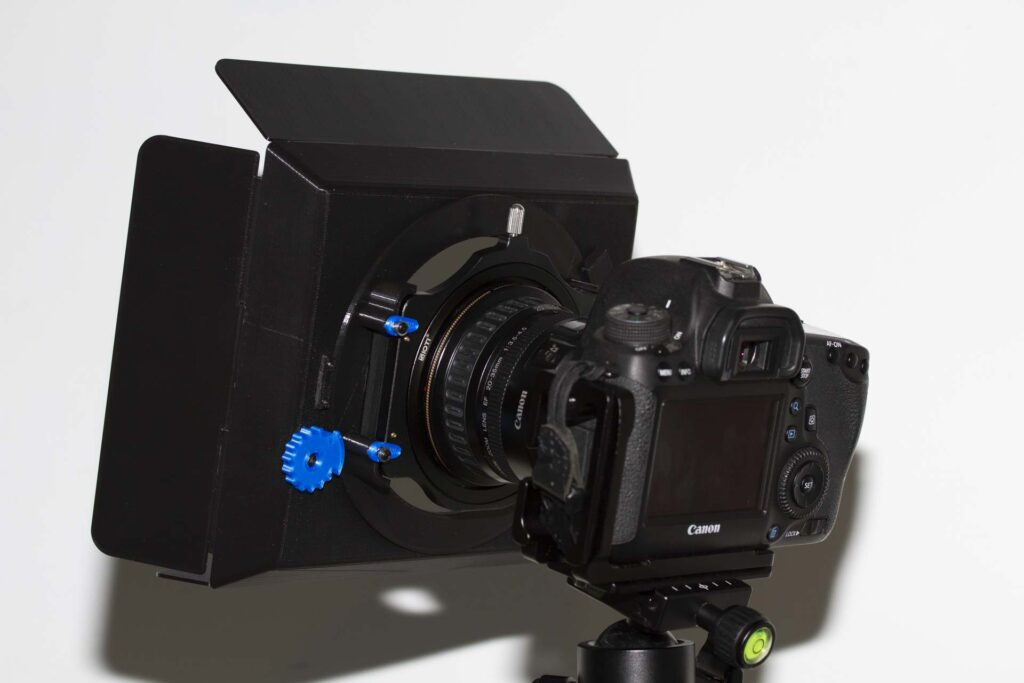
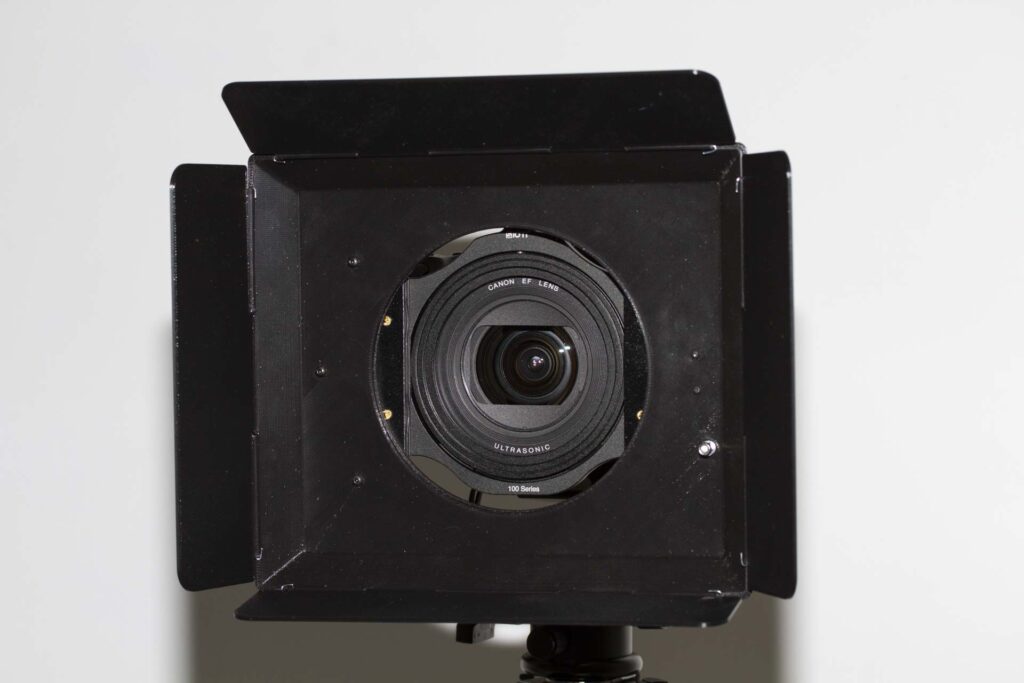
With our current lockdown restrictions it’s going to be a while before this gets tested out for real, but below is a front view of the hood on the camera, with the flags folded out:
and finally one from the back with the filter angled but the hood aligned with the frame:
I’ll add some pictures of the hood in use along with some of the images taken using it when we’re allowed out and about for more than just exercise again …
3 thoughts on “A Lens Hood for 100mm Filter Holders”
There are times when a lens hood is not required if there are no bright lights in front of your lens. Indoors many times you don’t require a lens hood. Shooting with on-camera flash with a shorter to normal focal length, you often can not use a lens hood. A solution to shooting without a lens hood is to use a flag, less bulky, and easy to pack into my camera bag: https://www.bhphotovideo.com/c/product/1665639-REG/smallrig_3199_simple_shade.html?ap=y&smp=y&msclkid=ddb1f35d5af51e5745ab97eb862eff51