The Background
Back in the day, when films were being shot for projection on the wide screen, film makers couldn’t afford to waste any of the frame especially as they were already losing a band up the side for recording the audio. In order to address this anamorphic (cine) camera lenses were developed. These horizontally compressed the image so that a wide screen image filled the frame. When the film was projected onto the wide cinema screen, a corresponding lens was used to stretch the horizontal dimension to fit the screen. Traditional CinemaScope used a 2x horizontal squeeze onto 35mm film, which when uncompressed gave a 2.39:1 aspect ratio.
A very interesting piece of technological history but not of great relevance for most of us, now we have high megapixel digital sensors shooting mostly for 16:9 ratio video reproduction. Unless, that is, you want to shoot for wide screen projection – certainly not something I expect to be doing in the near future.
However, there are a couple of the distortion effects caused by anamorphic lenses that are very distinctive and would be good for occasional use in both stills and video production. These are vertical oval “anamorphic bokeh” for out of focus highlights and horizontal flares from point light sources. Not the sort of things you necessarily want every day, but sometimes useful to give a shot a distinctive look.
So how can you get that anamorphic look with your modern digital camera? The expensive option is to buy a new anamorphic lens – they’re still in demand for (real) film makers, and new ones seem to be coming out all the time. The trouble is that they tend to have ‘real film maker’ prices. The last one I saw in the press was for micro four thirds cameras and had a price tag of about £3,000. So certainly not within the budget of the occasional user!
Option two is to buy an old anamorphic lens, restore it and adapt it to fit your camera. There appear to be plenty of these old lenses out there in various states of repair. I even saw an article about someone adapting an old cinema projection lens to fit their camera. With both of these options the recorded images need to be stretched horizontally in processing, but that’s not difficult using modern processing software.
Faking It
However, the option described here is all about is faking it: getting the effect of anamorphic bokeh on a budget. Anamorfake. After all it’s not the actual horizontal compression and expansion with the full gamut of distortions and foibles this produces many of us are looking for. No, it’s just those oval bokehs and horizontal flares and these can be produced fairly simply and cheaply.
For the oval bokeh the trick is to take an ordinary lens and replace the round aperture opening (or hexagonal, octagonal, etc. depending on the lens) with a vertically aligned elliptical aperture. Given that fashioning and assembling a set of variable aperture elliptical blades is likely to be beyond most of us, the new elliptical aperture will be a fixed size.
To get the horizontal flares there are several options, one of them being to fit a fine filament across the aperture opening from top to bottom. Since the lens is going to be getting opened up anyway it’s worth giving that one a try to see how it works.
If you want to find out more about anamorphic and anamorfake lenses the best place to start is on Tito Ferradans’ site.
The Donor Lens
The first thing you’re going to need for this project is a suitable donor lens. Judging by what’s out there on the web about these conversions, the most common lens to use appears to be the Helios 44 (particularly the 44-2 version). This is a 58mm f2 lens which comes with an M42 mount, has great bokeh characteristics in its unmodified form and is pretty easy to open up for surgery.
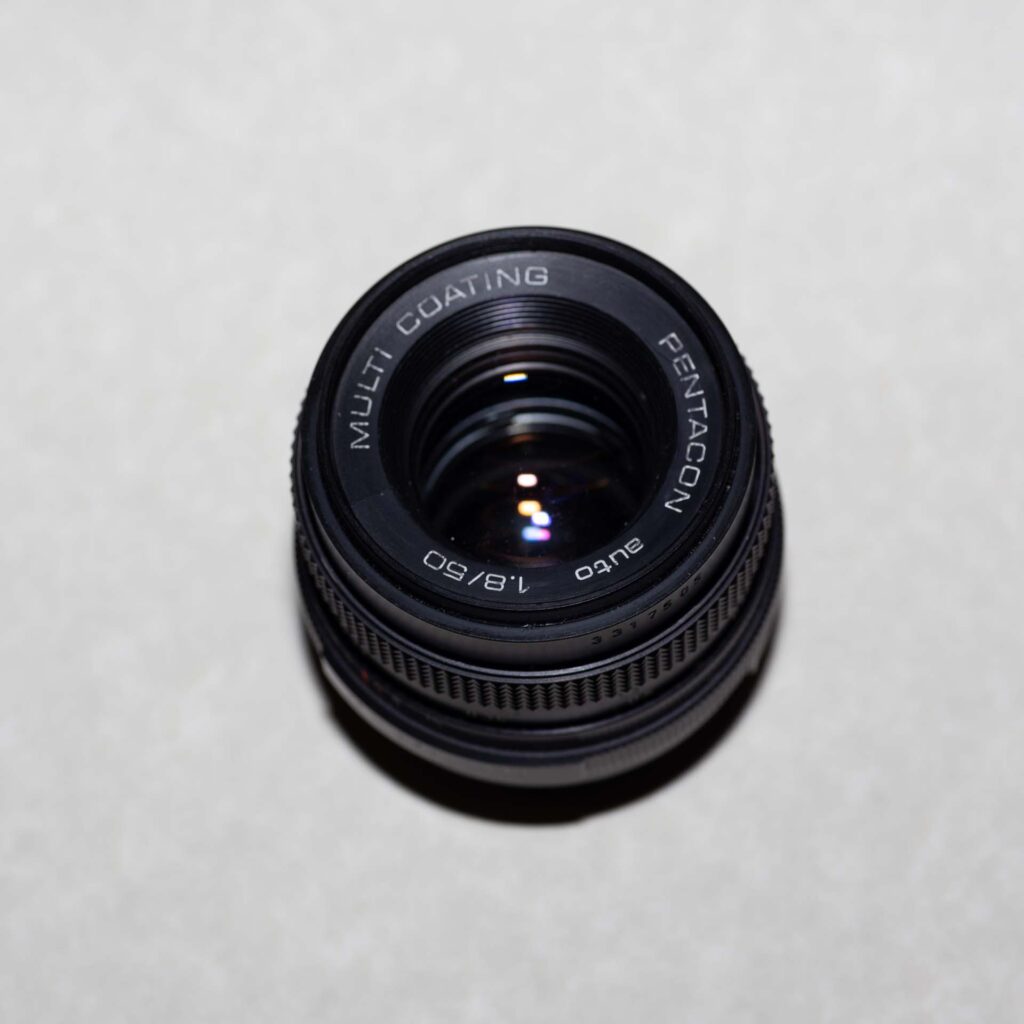
I’ve got a couple of Helios 44’s, but for this project I decided that I’d try something different: the Pentacon 50mm f1.8. Like the Helios the Pentacon 50mm has an M42 mount, has decent bokeh characteristics in its unaltered state (although it doesn’t have the legendary reputation of the 44), has a fairly simple design and is relatively easy to take apart.
The Sums
So how do you work out the size for the elliptical aperture? Basically you’re looking for the the area of the elliptical opening to be the same as the equivalent circular opening. The diameter of a circular aperture can be worked out from the focal length of the lens and the f-number of the aperture:
diameter = focal length/f-number
So, for instance, the diameter of the aperture circle for a 50mm lens at f 2.0
diameter = 50/2 = 25mm
Moving on, the area of a circle is πr2, and the area of an ellipse is πmn, where m is the length of the semi-major axis (the long one), and n the length of the semi-minor axis (the short one). For the elliptical aperture, based on the old CinemaScope horizontal squeeze of 2x, a good ratio of semi-major to semi-minor axes would seem to be 2:1. If you know the diameter of the circular aperture, you can work out the radius (½ * diameter) and the area, then back calculate the semi-major and semi-minor axis lengths for an equivalent elliptical aperture from that.
circular aperture area = πr2
elliptical aperture area = πmn
if m = 2 * n (2:1 ratio)
elliptical aperture area = π * m * ½m = ½πm2
So if the circular area is equal to the elliptical area: πr2 = ½πm2
m = √(2r2)
For example, applying the formula for an aperture of f4 with a 50mm lens
r = (50/4)/2 = 6.25mm
gives m = 8.84mm, n= 4.42mm
I drew up ellipses for a range of apertures ranging from f3.2 to f5.6 using Visio, since I already had it on my laptop. Before getting too carried away drawing and cutting out aperture disks, it’s worth finding out what the largest sensible aperture you can fit in the lens is going to be, as a lens with a round aperture of f2 isn’t going to be able to fit an elliptical aperture of f2 as the semi-major axis will be longer than the radius of the round aperture.
Also bear in mind that having a semi-major axis the same length as the radius of the existing circular aperture is only going to work if the elliptical aperture is right on top of the circular aperture, otherwise the ends of the ellipse are likely to get clipped off. And nobody wants their bokeh to be clipped ellipses … So this might take some experimentation to get the biggest ellipse that gives the nice clean elliptical results we’re looking for.
Lens Strip Down
One early decision that has to be made is whether to remove the round aperture mechanism from the lens when the elliptical one is being fitted. Doing this will probably make the mod a one-way process, and is likely to need more lens butchering to make it possible, but I felt it was worth the trouble for two reasons. First it allows you to get your new aperture ring right where you want it (i.e. where the original aperture was), and second if you put your new aperture disk on top of the existing mechanism it’s more likely to get misaligned if you adjust the lens’s aperture ring or stop it down.
Depending on the version of the Pentacon 50mm lens, the aperture mechanism can be removed either by accessing the lens from the front or the rear. My lens was a relatively new version, so it could be done from the front.
The first (and most difficult) stage in accessing the aperture from the front is removing the plastic front trim with the lens details on it. This is a bit of a brute force job as there don’t appear to be any accessible screws to loosen it. Set the lens to minimum focus distance so the front piece protrudes as far as possible and try to unscrew it anticlockwise.
To give extra purchase I ended up putting a piece of rubber material on the front of the lens trim and pushing and twisting this with a section of plastic pipe that just fitted inside the filter threads. It took a few tries, but eventually the trim started to loosen and it could be unscrewed by hand. If I was going to be opening up a few lenses I’d probably get hold of a set of these to make life a bit easier. However, I have a second one of these lenses and managed to take the front trim off by just twisting it by hand, so it’s not always a such a difficult job.

With the trim removed you can see the helicoid and two pairs of slots for unscrewing lens elements. Using a lens wrench on the outer pair it’s possible to remove the whole of the front lens group. There’s probably no point in separating the group unless there’s cleaning needed on the inside surfaces of the lens elements.

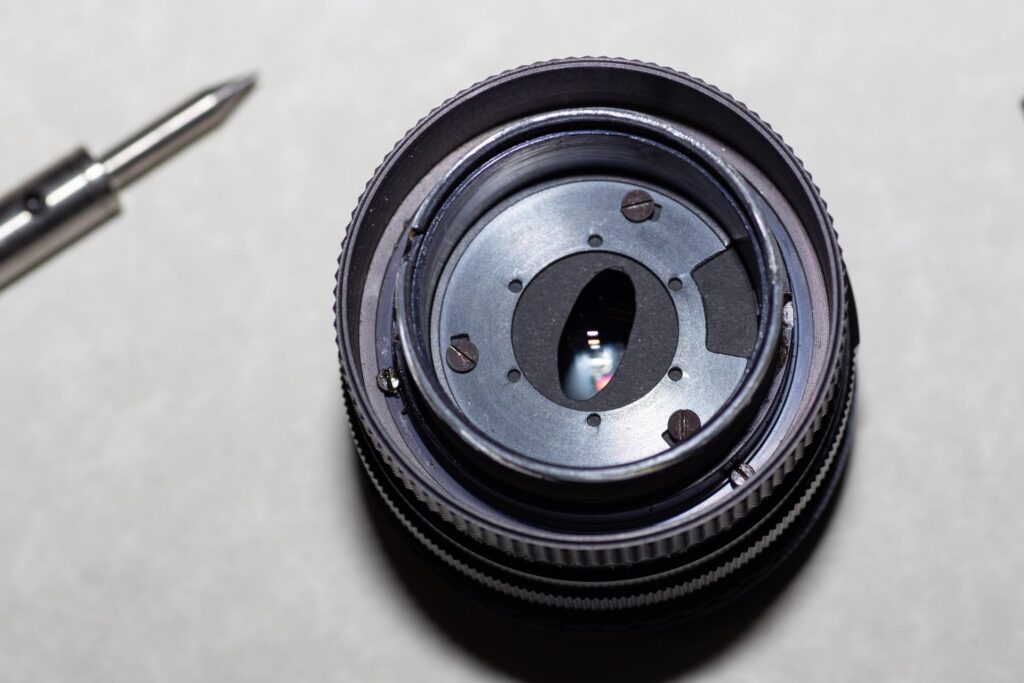
With the front group removed the lens aperture mechanism is exposed: there are three screws holding it in place. Remove them, then lift out the aperture top plate followed carefully by the second plate with the blades resting on it. These aren’t going to be needed again unless you plan to reassemble the lens with its round aperture.
If you do plan to reassemble be careful with the plate with the blades on as it’s quite fiddly to get them back in place correctly if they fall off. With the aperture mechanism gone you now have a 40mm diameter hole in front of the rear elements in which to fix the home made elliptical aperture plate: there are even three holes for fixing it in place so it stays correctly aligned.

One thing worth noting when you take out the conventional aperture mechanism is that the diameter of the hole in the plates that hold the blades in place is 20mm. I have no idea how this relates when the calculated diameter based on focal length and f-number (focal length/f-number, i.e. 50/1.8) gives 27.78mm, but a practical answer should come out in testing.
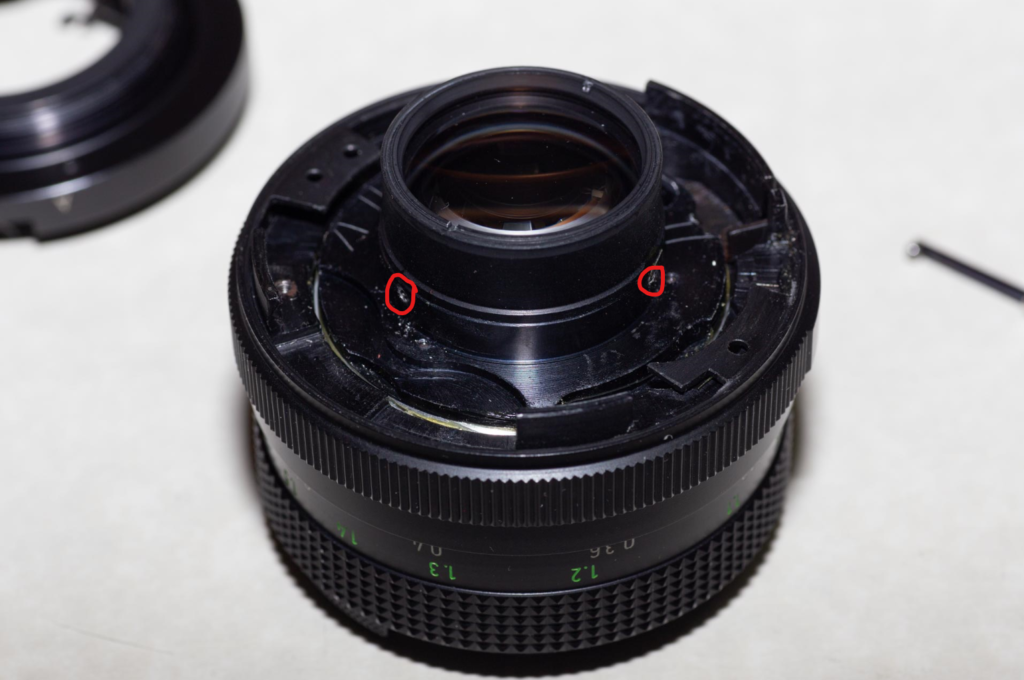
If you need to do it, taking the rear elements out of the Pentacon lens is pretty straightforward. First remove the three screws on the back of the lens (circled), then lift off the back/lens mount section.

Next draw an alignment line up the side of the inner barrel to help align the element when you reassemble: I’m not sure if this is strictly necessary, but it’s not much effort, so probably worth doing anyway. Then loosen the three grub screws on the inner barrel – don’t remove them or reassembly will be a whole lot more difficult.
The rear elements can now be removed, giving access to the back of the aperture assembly. I think on some of the earlier versions of the lens it’s possible to remove the aperture from here, but on my version you have to go in from the front.
Testing Aperture Sizes
The test apertures were printed on reasonable quality photo paper and cut out with a scalpel, then coloured black using a sharpie. Testing the way they rendered of out of focus highlights coming through foliage, the first aperture to give nice clean elliptical bokeh was the f4 equivalent. The f3.2 was not bad, but there definitely appeared to be some flattening at the ends of the ellipse, which were probably not all to do with the roughness of the hand cutting. Ultimately, this wasn’t a major surprise given what I’d found when I measured the original diaphragm mechanism.
One final test was to add a piece of very fine fishing line from top to bottom across the elliptical aperture disk. This is one of the potential methods for giving horizontal flares from point light sources, and it certainly did that. The problem is that it also gives a vertical shadow in each of the elliptical out of focus highlights. This seemed like an unacceptable trade off to me, so I didn’t include the fishing line in the ‘production’ version. The two images below show the highlights without fishing line (left) and with fishing line (right):


The vertical lines can be seen in some of the less bright highlights in the right hand image above. While not particularly obvious at this magnification they become a lot more intrusive when the image is zoomed or enlarged.
Final Version
Once I’d decided on the aperture size I was actually going to use, it made sense to look into getting the disk manufactured on something a bit more robust than paper and with good clean laser cut edges rather than the prototypes’ rough scalpel cuts. Well, that was the theory!
Looking at possible materials it appeared the thinnest I could get was 0.5mm high impact polystyrene, which is way thicker than the regular aperture blades, so I’m not sure how that would affect the highlights. However the cost for getting a few of these made to test was out of sight for a one-off so it was back to using paper. This time I used matt black paper so at least the disk didn’t have to be coloured in.
To hold the paper disk in place I removed the aperture blades and the actuating rod from the old aperture mechanism, fixed the disk to the plate that used to have the actuating rod attached to it with a couple of very small pieces of double sided tape, added the front plate and screwed it all back in place in the lens body, being careful to get the ellipse lined up so it would be vertical when the lens was mounted on my camera. For alignment I’d stuck a piece of masking tape to mark the top of the lens while it was on the camera. (The top when the lens is mounted on an M42 camera isn’t the same as when it’s on a Canon EF to M42 adapter.)
Once the aperture was in place I cleaned the front lens elements and reassembled the front of the lens. For completeness I then took out the back elements again and gave them a clean – might as well start with a nice clean lens! Since the ellipical aperture is attached to the old rear aperture plate, its alignment can be adjusted if it’s slightly off vertical by moving the old actuator arm (arrowed below).

Note also in the picture above the steel ball that goes under the auto-manual switch. This isn’t really needed after the mod, but I put it back in place when I reassembled the lens as it keeps the switch tight. You wouldn’t want the ball rattling around inside the lens, so this way you know where it is.
But What About Those Horizontal Flares?
Having binned the fishing line on the aperture disk idea, the flares are going to have to be created by something external to the lens. I’ve tried a piece of fishing line stretched vertically across a filter holder in front of the lens: that worked pretty well. As an alternative a scratch on a resin filter worked ok, but not as well as the fishing line. Ultimately I’m not too happy with either if them as a long term solution, so I’m going to break the creation of a flare filter out into a separate project …
5 thoughts on “Anamorfake: Anamorphic Bokeh on a Budget”