Where can you get hold of a flexible optical trigger unit for a portable strobe? I’ve got a few of these type of units, but the trouble with them is that if the key strobe unit is set to low power and the sensor isn’t in direct line of sight the firing of the receiver strobe unit can range from fairly ‘hit and miss’ to entirely ‘miss’. This can get very frustrating.
In theory separating the sensor from the receiver flash unit might give something that’s a bit more flexible and reliable. This seems like an obvious solution, but quite honestly I can’t recall ever seeing such a thing for sale. So the best way to try it out – build it and see if it works!
Parts List
- Photodiode: BPW34
- Resistors: 680, 150k and 220k (x2)
- Capacitor: 4.7nF
- Transistor: general purpose npn type – BC547
- Optoisolator: TLP3042 (Photo-Triac)
- Vero strip board
- Project box (60mm x 36mm x 25mm)
- Phono plug and socket
- 2.5mm mono jack socket
The circuit is pretty simple and looks like this:
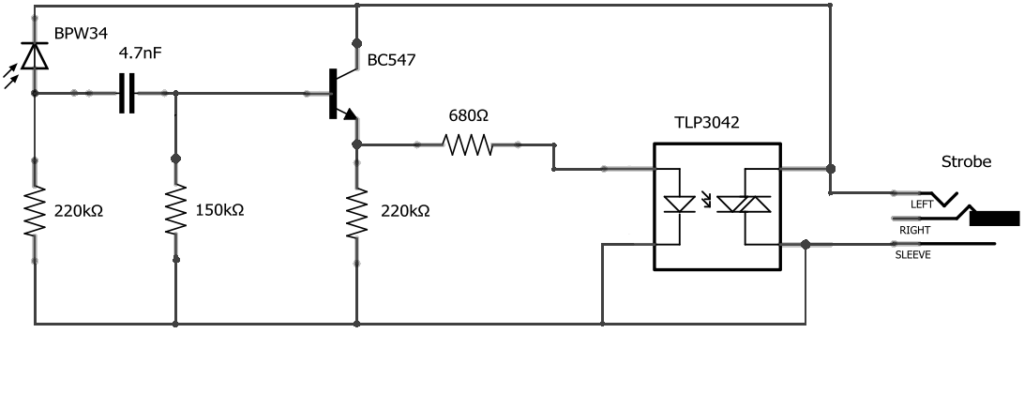
The circuit is powered by the voltage on the strobe’s sync input, so no batteries are required. Note that the circuit is designed to work with a strobe with a low sync voltage, not one of the high-voltage dinosaurs I built the safe sync circuit to handle. While the triac in the optocoupler can work with a high voltages, the rest of the circuit hasn’t been designed with this in mind, and would need a few additions for high sync voltage operation.
How it works:
When there’s not much light falling on the photodiode it’s in a non-conducting state, so its anode is pulled to zero by the 220kΩ resistor. A burst of light (from the master strobe) causes the photodiode to conduct, pulling one side of the capacitor high. The capacitor and 150kΩ resistor work as a high pass filter, creating a spike at the base of the transistor, which turns on pulling the emitter high and making a current flow through the diode in the photocoupler (optocoupler). This turns on the triac in the switching side of the TLP3042 photocoupler, shorting out the strobe’s sync contacts and making it flash. Or something like that …
Build
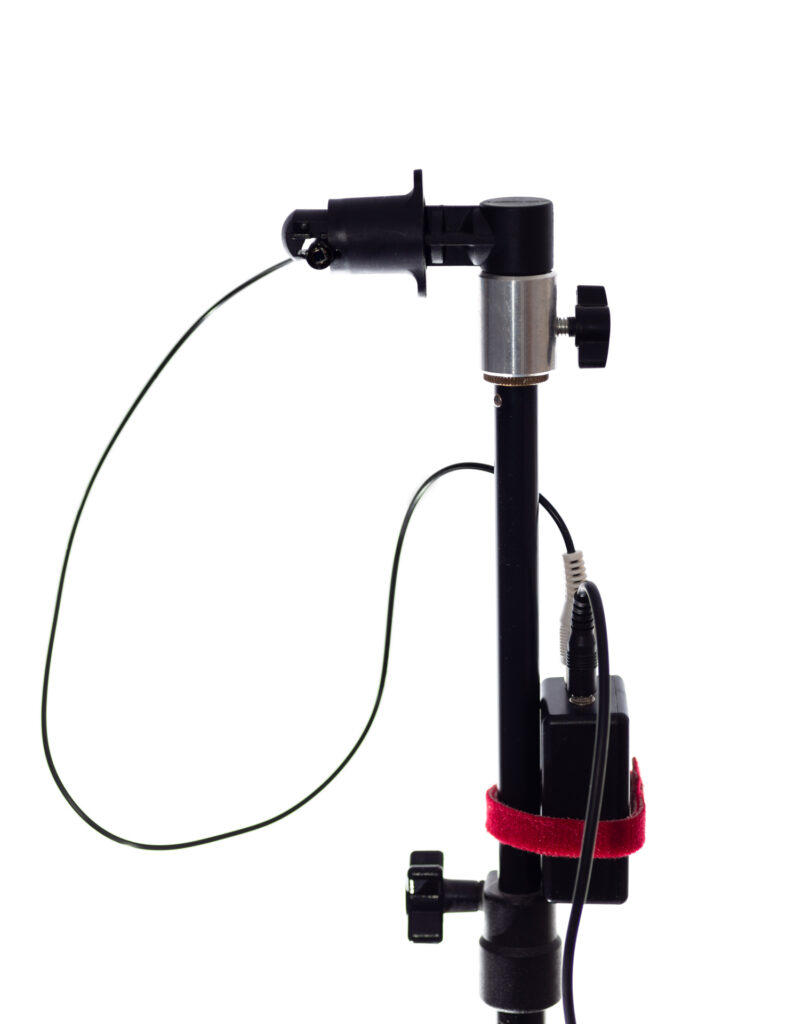
The circuit was built up on vero strip board: not the most space efficient way to do it, but space wasn’t a particular issue for this project. Working along the same lines as with the photogate trigger I built a few months back, to give maximum flexibility in positioning the actual sensor the photodiode isn’t in the same box as the rest of the electronics. The connection for the sensor is a phono socket on the end of the project box, next to a 2.5mm jack socket for plugging in the strobe unit (either directly with a sync cable or via a hot shoe to sync adapter attached to the strobe’s shoe).

Rather than put the photodiode sensor in another box I glued it (with 2-part expoy) into an offcut of carbon fiber tube left over from a long defunct self-build quadcopter. When the glue was set I back-filled the tube with silicon RTV sealant. The sensor is on a cable about 50cm long, so given that the sync cable from the strobe to the receiver srobe unit can be several metres long, there’s definitely potential for having the sensor quite a distance from the strobe it’s firing.
Completed Unit
The picture below shows the unit in use – sort of (it’s a demo shot with a very simple setup that isn’t really using the unit’s flexibility). A strobe on the camera’s hot shoe is the main light: the sensor and receiver unit are mounted on a light stand and triggering a second strobe on the floor that’s filling in the background.
In testing the unit has proved to be pretty sensitive, giving reliable triggering with reflected light when the transmitter strobe is at its lowest power setting and fired into a light coloured wall.
One of the real motivators for putting this together was for drop photography. Trying to get a second strobe to trigger from reflected light with the main strobe shooting through an opal perspex background was proving next to impossible. With this unit providing the triggering it works every time!
One thought on “How to Build a Cheap, Flexible DIY Strobe Trigger”