Possibly the most famous lens to be be produced in the former Soviet Union was the Helios 44. This was a copy of the Carl Zeiss Biotar 58mm f2 lens first produced in the 1930’s. It was produced in huge numbers in various forms for about 40 years, often supplied as the kit lens for Zenit cameras.
I’ve owned a couple of old Soviet-era Helios 44 lenses for several years: a 44M and a 44M-4. They were bought for occasional use to give me the legendary Helios 44 swirly bokeh. I did have plans to mod one of them with a fixed elliptical aperture, in similar style to my Anamorfake Pentacon lens, but that hasn’t quite happened yet.
There are other older variants of the lens out there that I thought I’d like to try. To this end my 44 lineup was extended to include what’s probably the most famous Soviet lens of the lot – the Helios 44-2. Recently I also managed to get my hands on one of the earlier ones, the Helios 44.
The problem with old lenses …
When my 44 arrived it looked like a previous owner had tried to clean the front element with a finger while they were eating a bag of chips (as we call them: fries to everyone else). The back element wasn’t a whole lot better. The lens also had a very stiff and uneven focus action.
This prompted me to take a more critical look at my other 44’s. Externally the 44-2 looked a lot better, but it was suffering from internal dust and a few internal fibres, plus a bit of oil on a few of the aperture blades. It also had a very stiff aperture adjustment ring. Looking at my two other 44’s revealed that they were also pretty dusty, and the 44M-4 had a very stiff and rough-feeling focus action.
So rather than building something new, this post is about taking the lenses apart, cleaning them up and putting them back together. With that done I took them all out to see how they compare. As the title says – fun with 44’s!
Helios 44
First up the oldest of the bunch: the 44. Mine is an 8 aperture blade version rather than the earlier 13 aperture blade version and has an M42 mount rather than the original M39. With the 44’s it’s not possible to tell the year of manufacture from the serial number. The lens does however carry the mark of the KMZ factory, so I know where it was built.
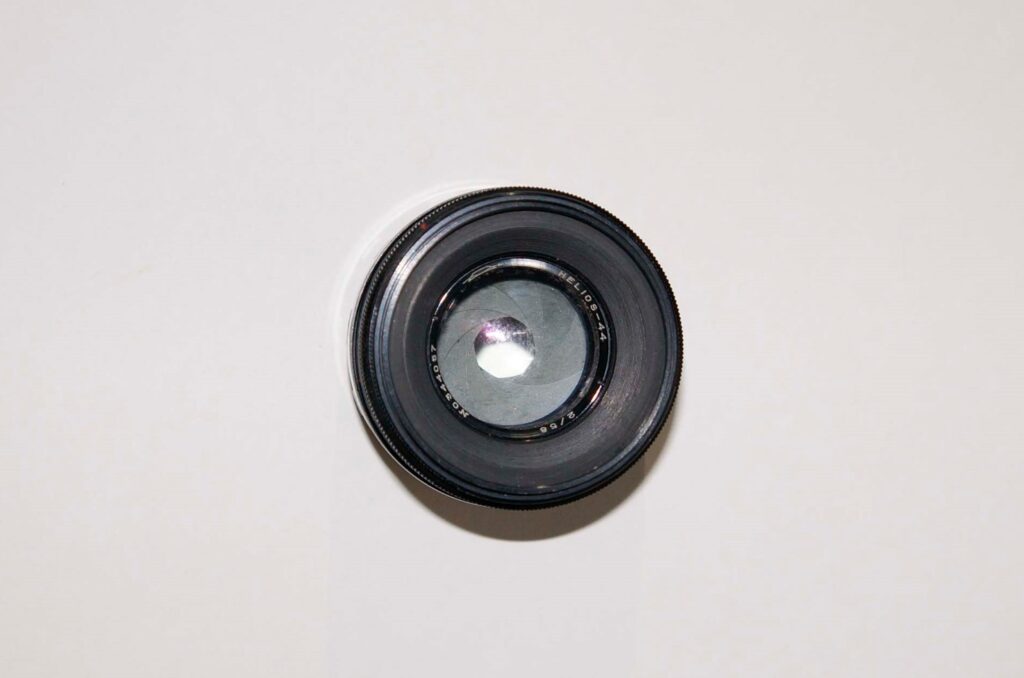
Apart from the heavily smeared front and back lens elements the lens was in good condition. There was no oil on the aperture blades and the aperture rings weren’t sticky, but the focus action was very stiff. This meant as well as cleaning the glass I was going to have to strip and regrease the helicoid – not my favourite job, but needs must!
Helios 44 Helicoid Cleaning
Disassembly
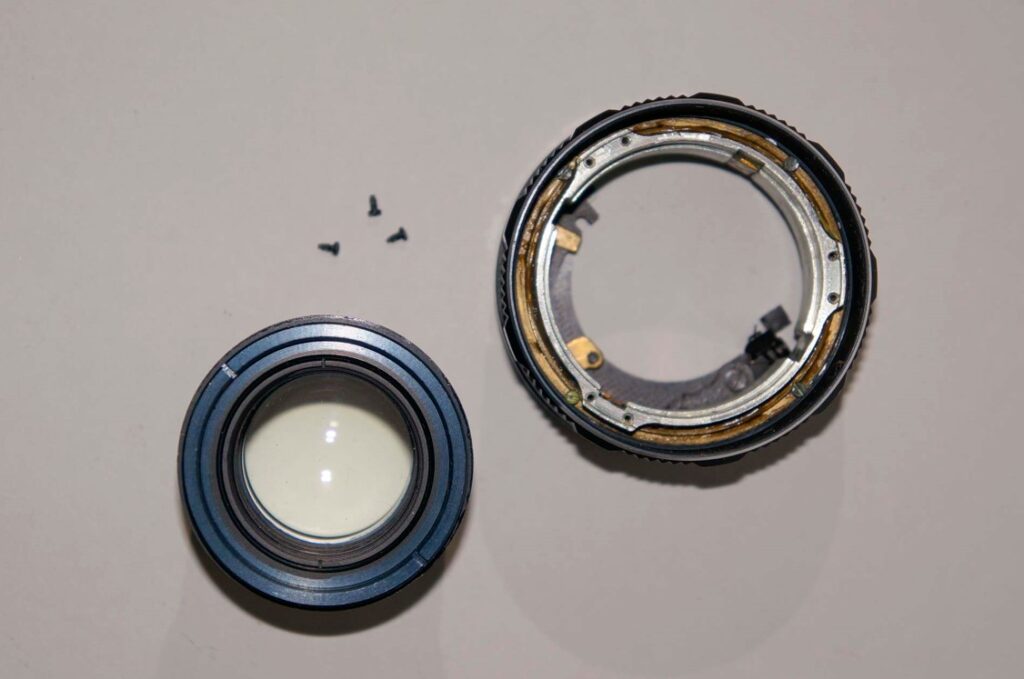
The first job was to remove the optical block from the focus mechanism. With the 44 (and 44-2) this is simply done by unscrewing it: holding the focus ring the optical block was unscrewed by turning it anticlockwise.
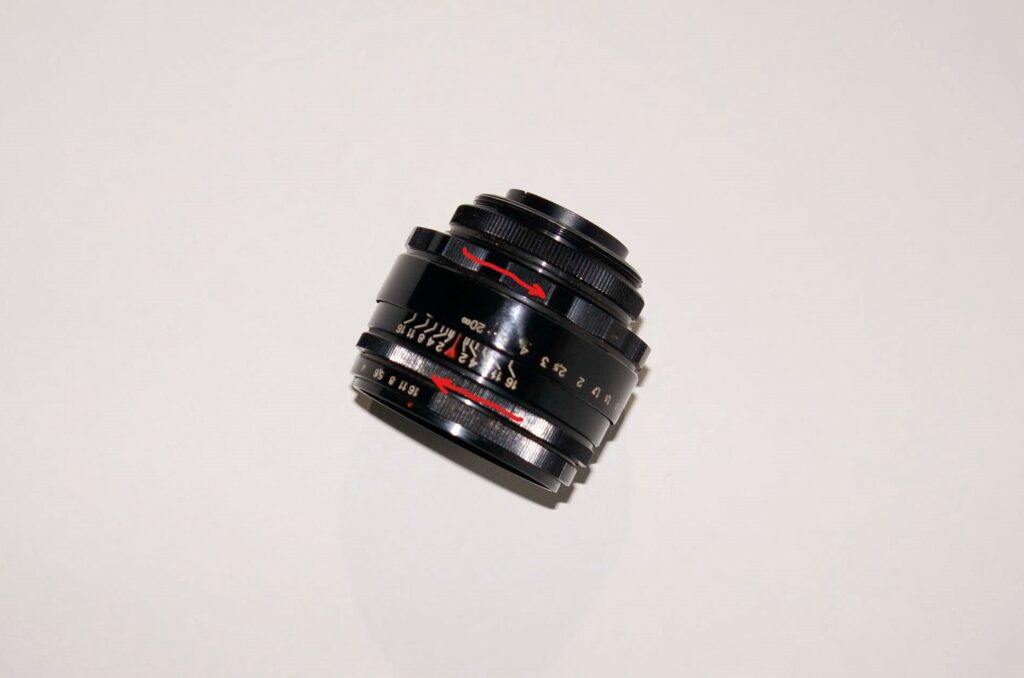
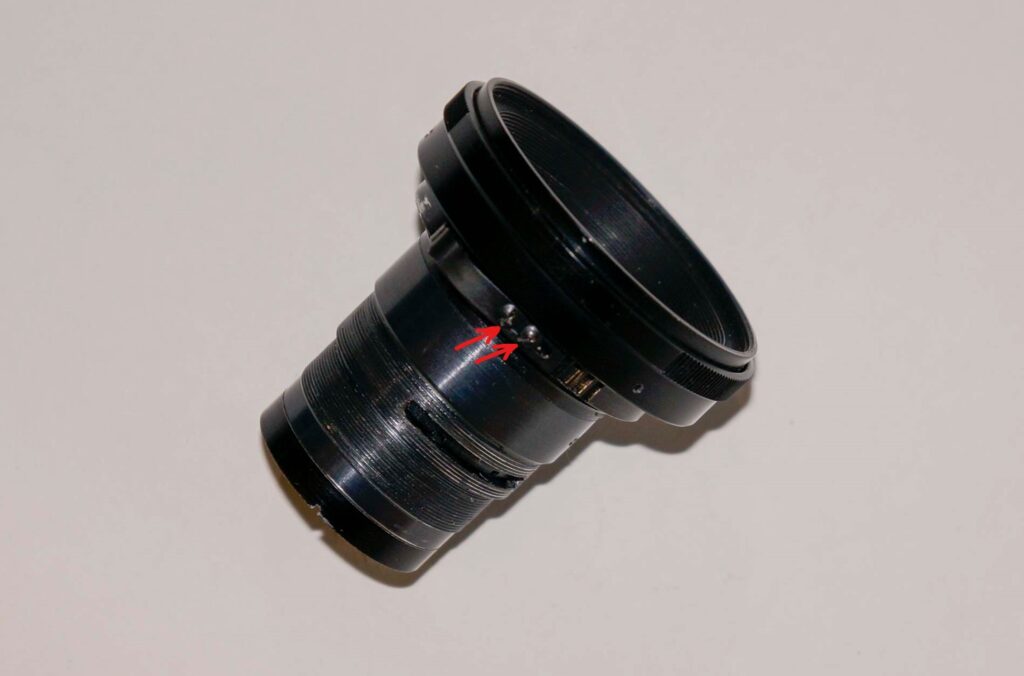
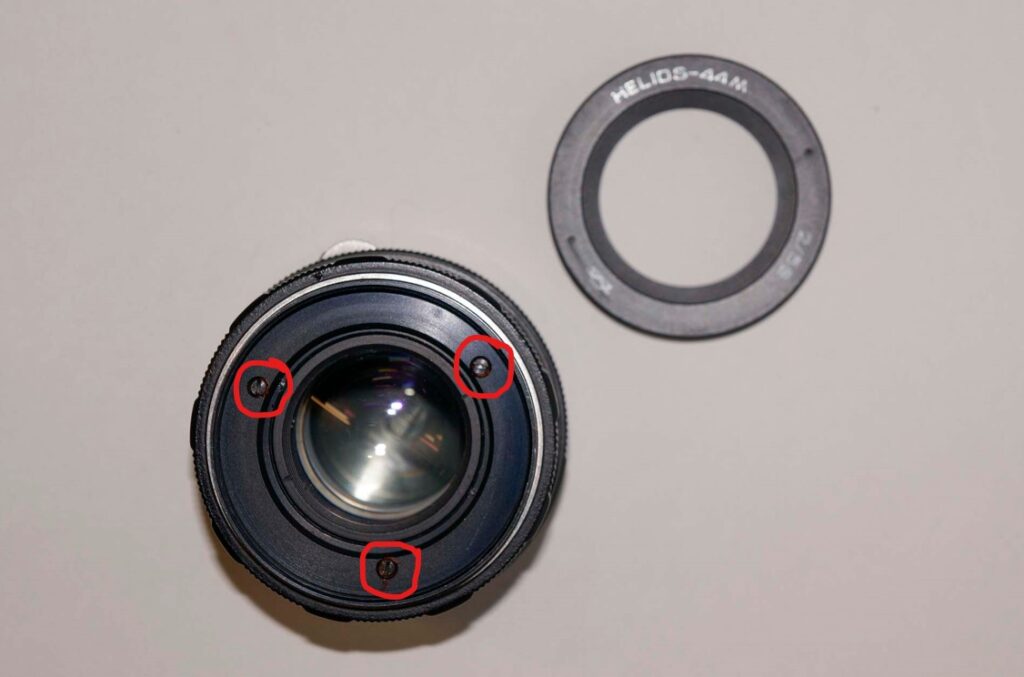
The focus ring could then be removed by loosening (not removing!) the three screws set into the ring:

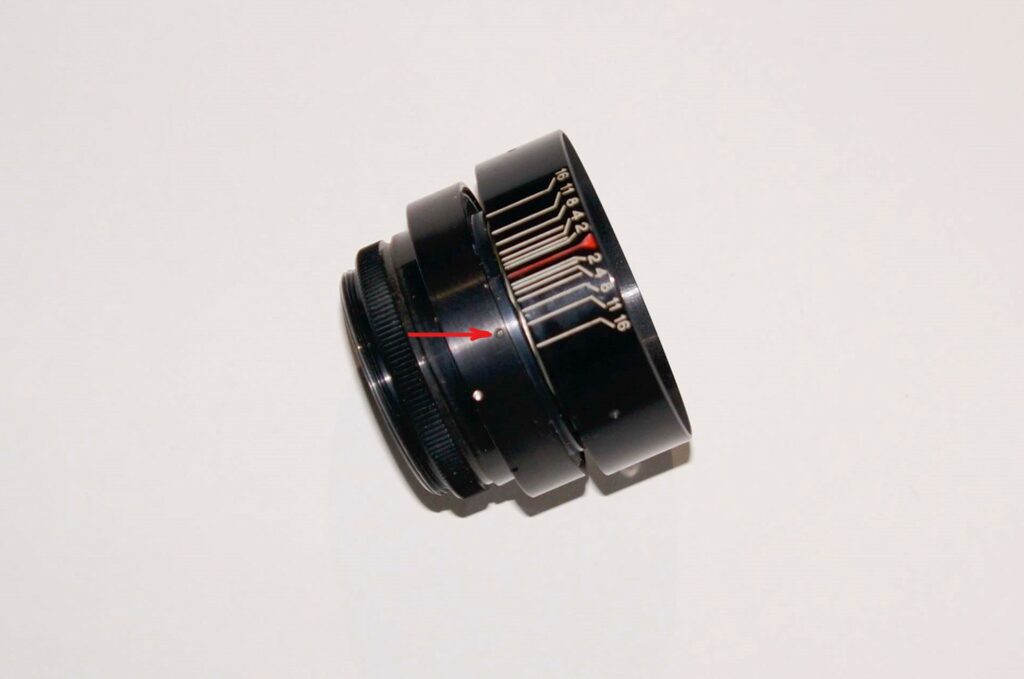
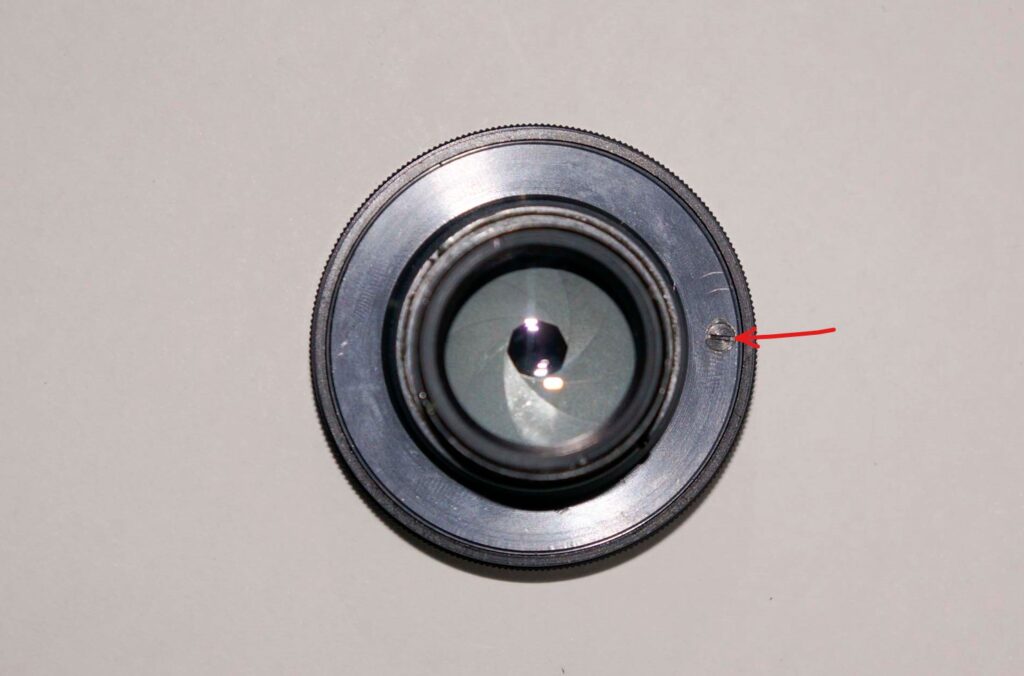
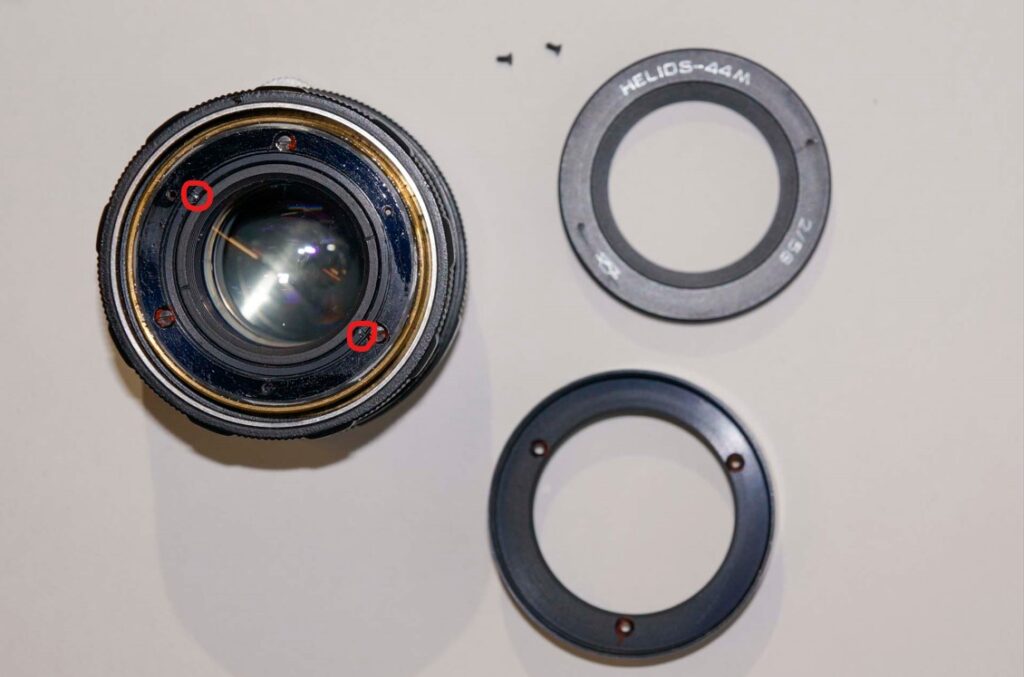
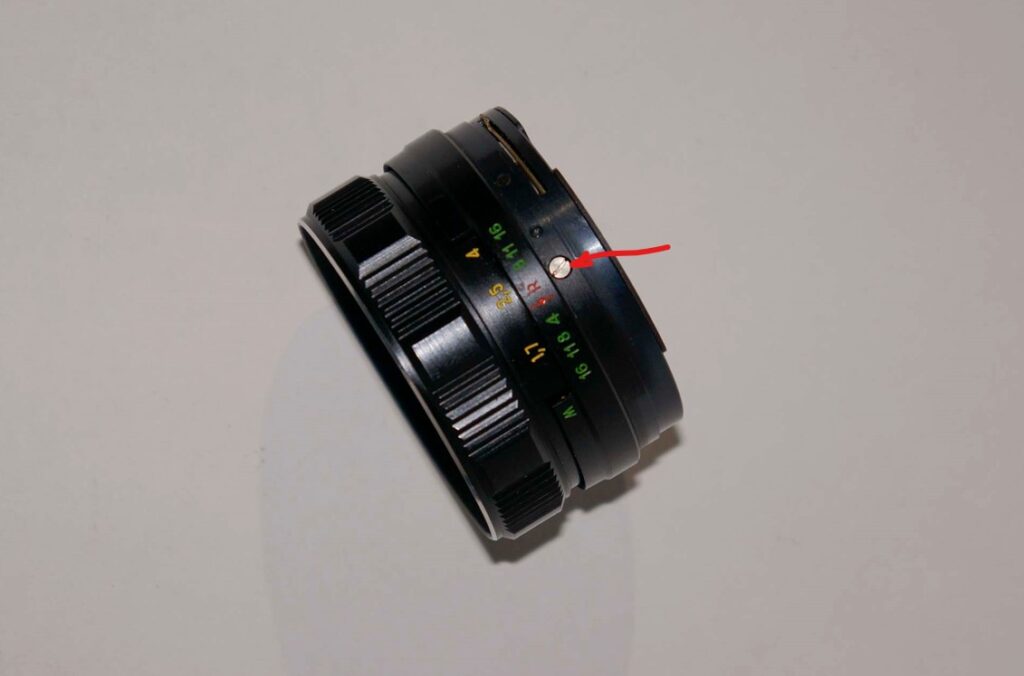
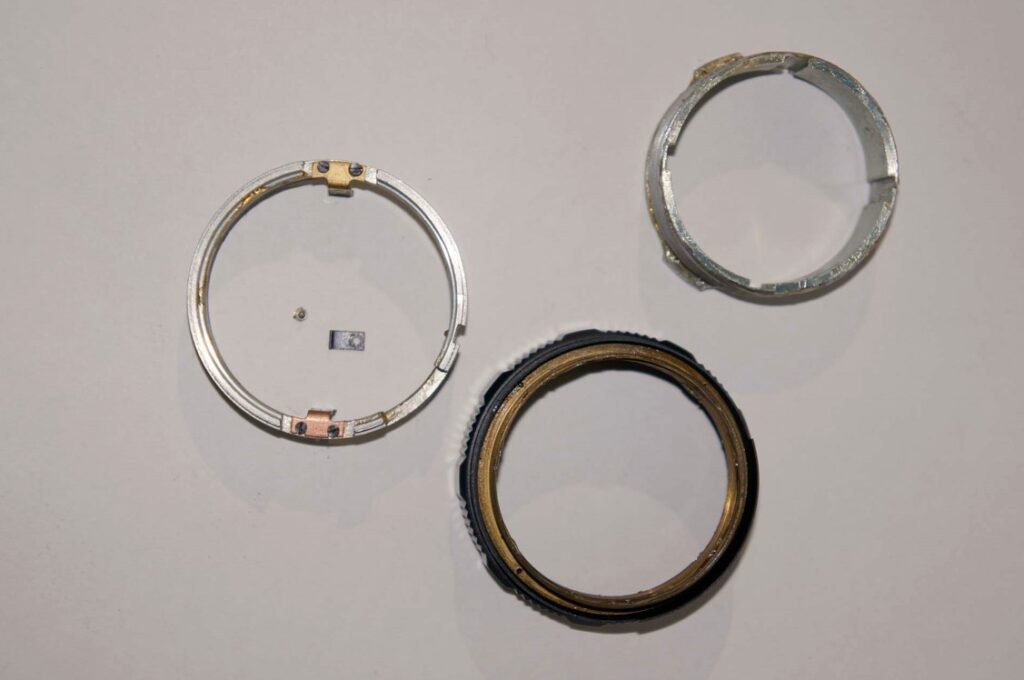
This revealed an inner ring that was removed by taking out the three (very small) screws set round its circumference, one of which is arrowed below:
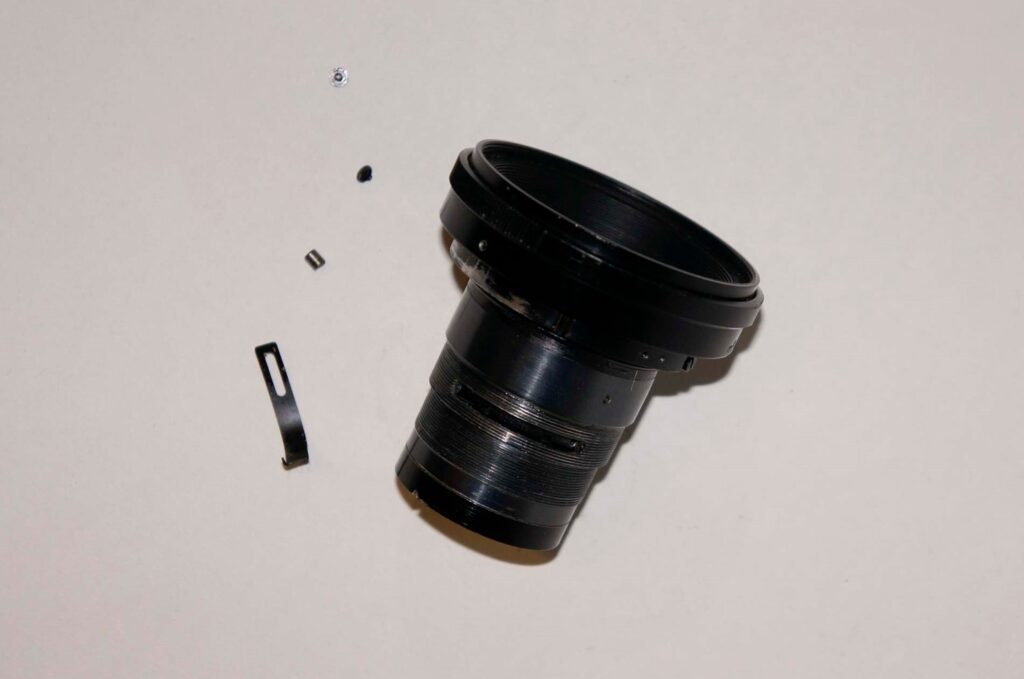
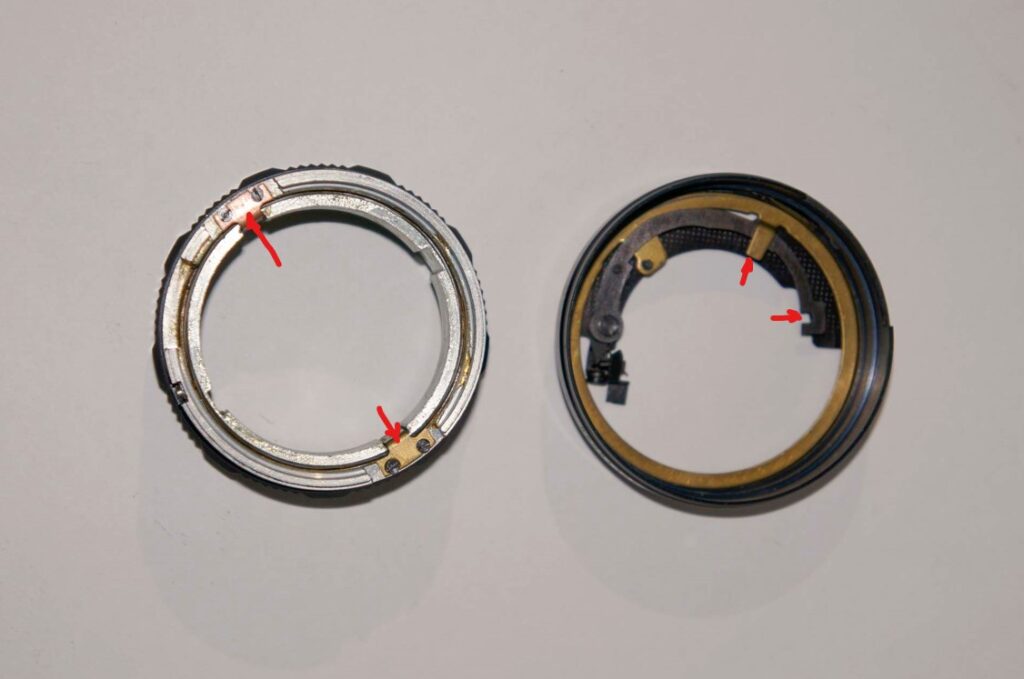
With the screws out the inner ring could be unscrewed and removed. There are slots on the back of the ring (see below) to allow it to be loosened with a lens wrench as there isn’t much to grip on to get it started:
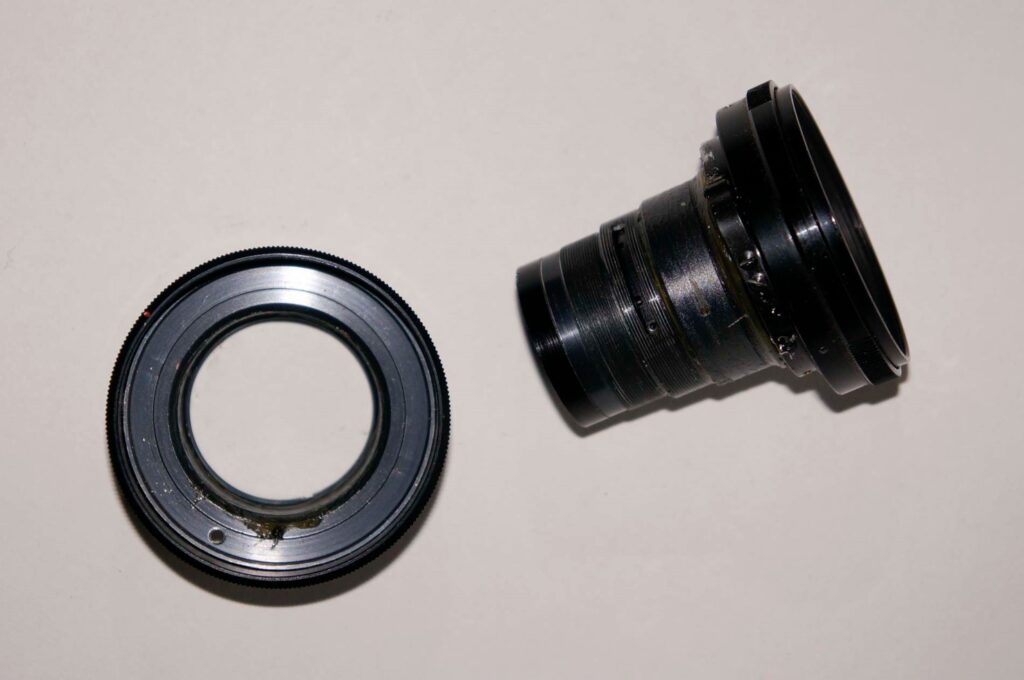
When the ring had been taken off the mount could also be removed from the back or the focus block – it just pulled away.
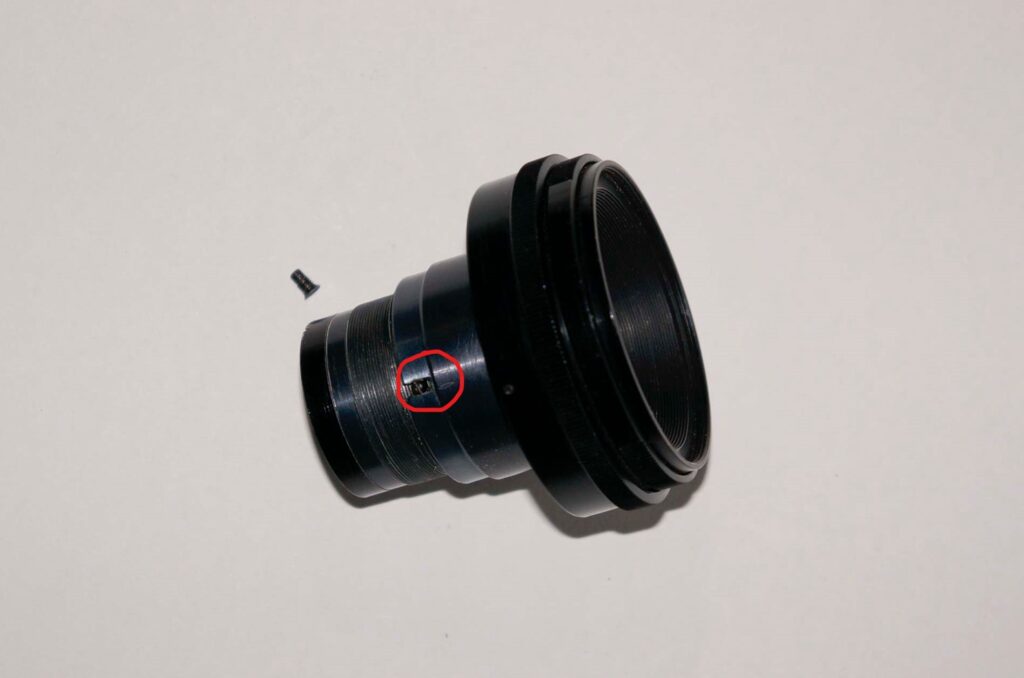
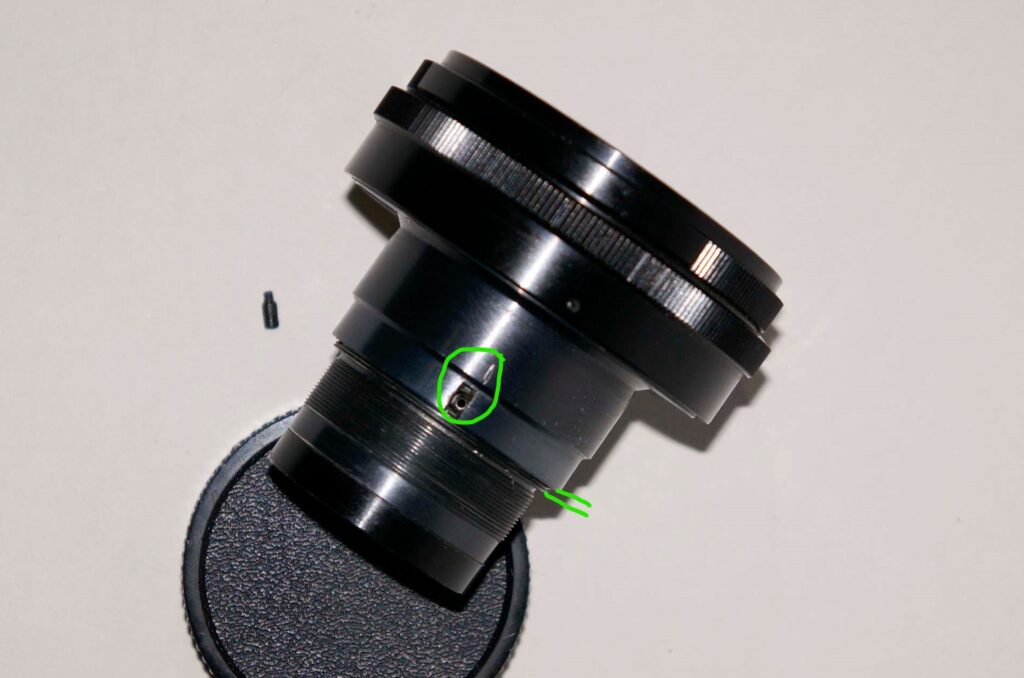
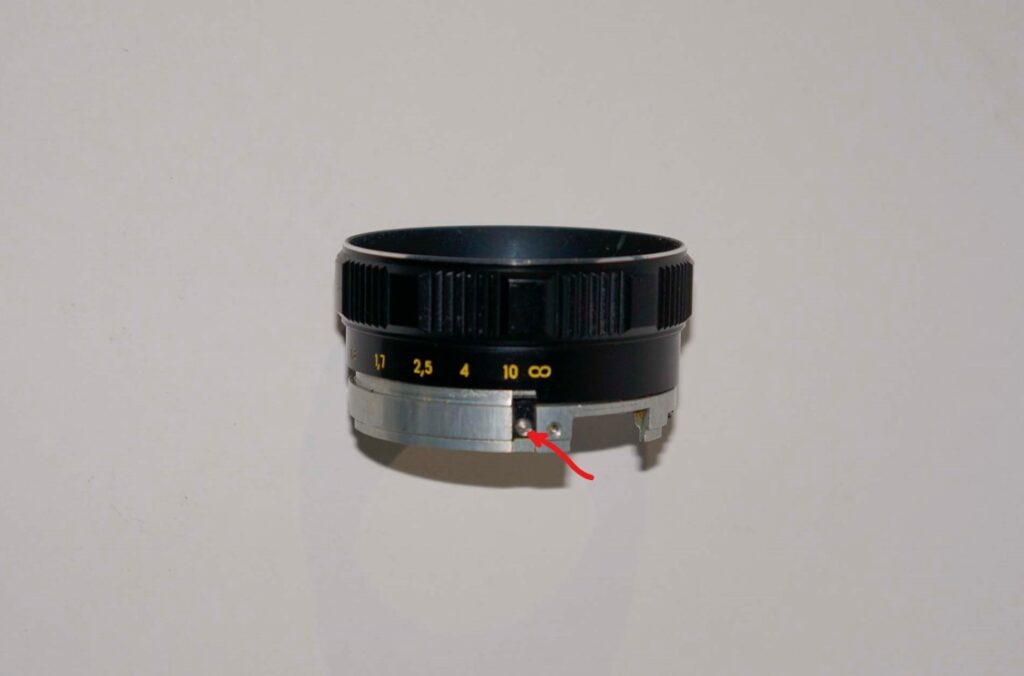
That left one more ring to be removed, but first the stop screw (circled above) had to be taken out from the side This one was very tight and had to be freed up with a drop of WD40 before being unscrewed. Now the final ring could be unscrewed from the block. This was done slowly, and as it came away from the helicoid its position was marked (see below). The helicoid is a multi-start thread, so having this alignment mark makes reassembly a lot easier.

Cleaning and Reassembly
The four parts were de-greased with isopropyl alcohol applied with a toothbrush and cotton pads, with the harder to reach bits cleaned with cotton buds. Before and after shots are shown below. Note: a lot of grease had already been removed during disassembly to avoid spreading it around everywhere when handling the helicoid parts.
All the threads, along with the slot on the inside of the mount, were relubricated with helicoid grease prior to putting it back together. Reassembly had a few tricky steps. The first of these could have been getting the first ring back on the helicoid with the correct alignment, but the alignment marks I’d scratched during disassembly made this simple.
With the first ring back on and the stop screw replaced the mount was pushed back on, with the slot on the inside engaged with the stop screw. Next the inner focus ring was carefully screwed back on until the indents from the grub screws aligned with the grub screw holes. The grub screws were then replaced and tightened – these are very small and fiddly.
With the focus set to infinity the focus ring was replaced and the three screws in the side tightened. Finally the optical block was screwed back into the focus block. Job done.
Helios 44 Optics Disassembly, Cleaning and Reassembly
Rear Lens Group
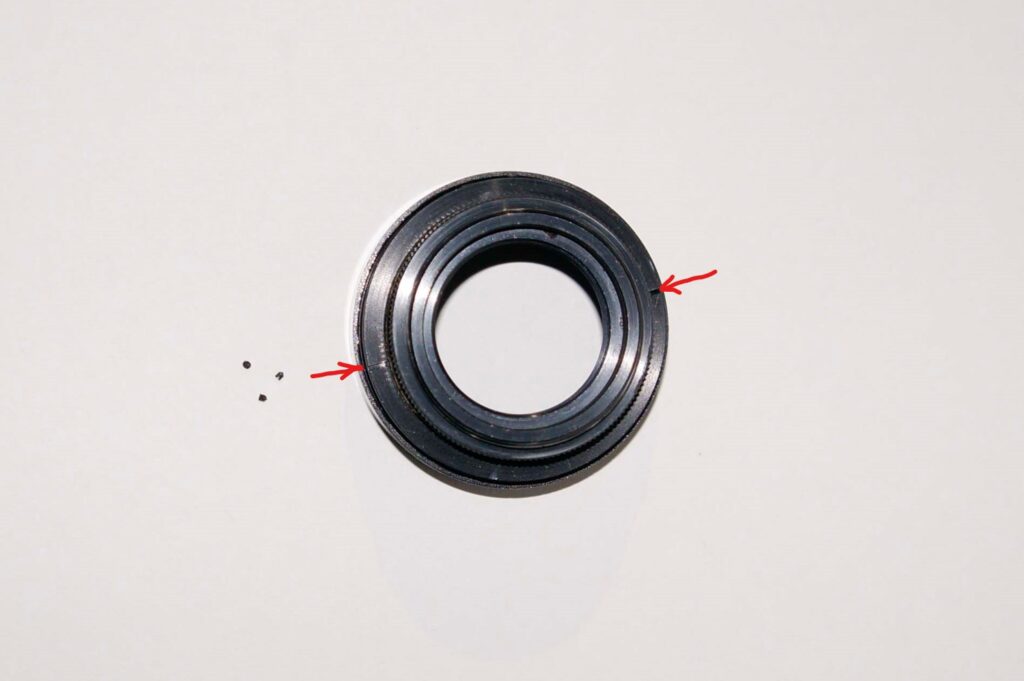
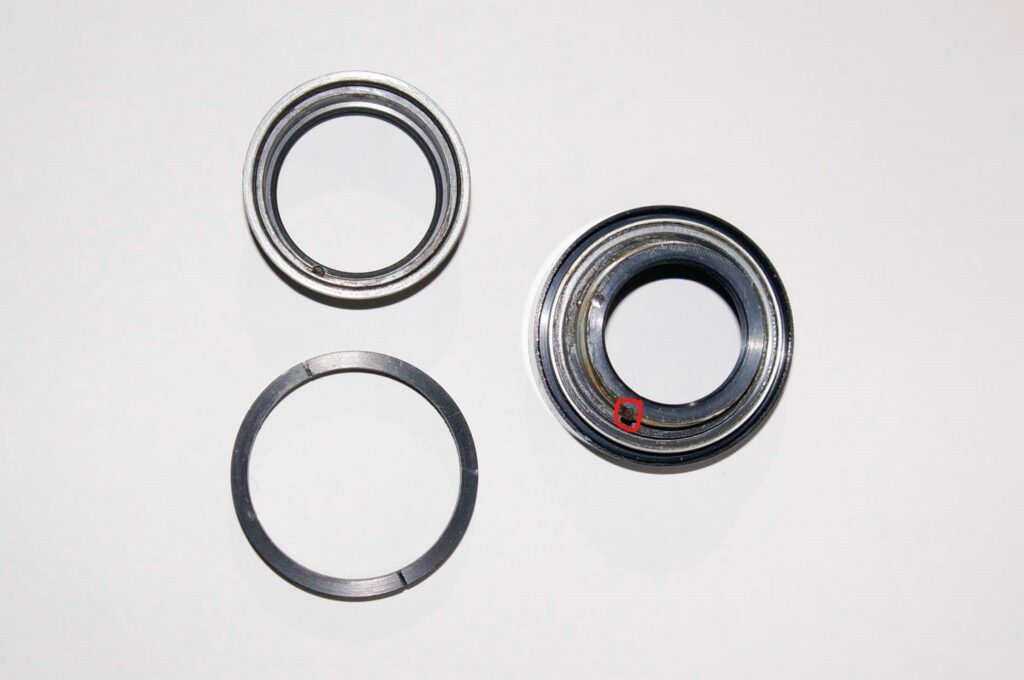
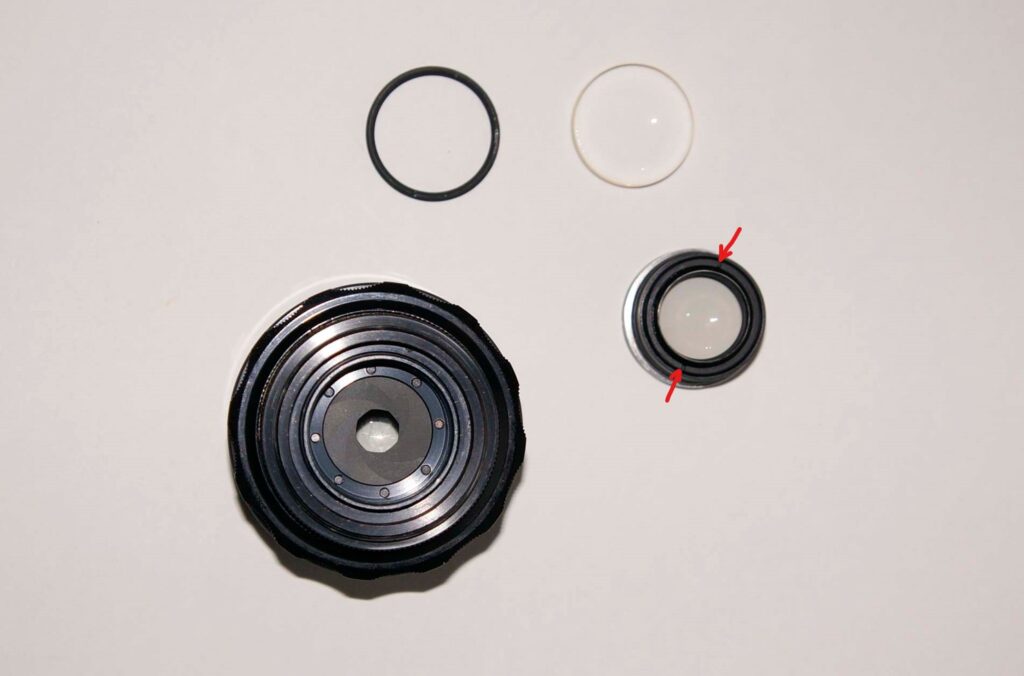
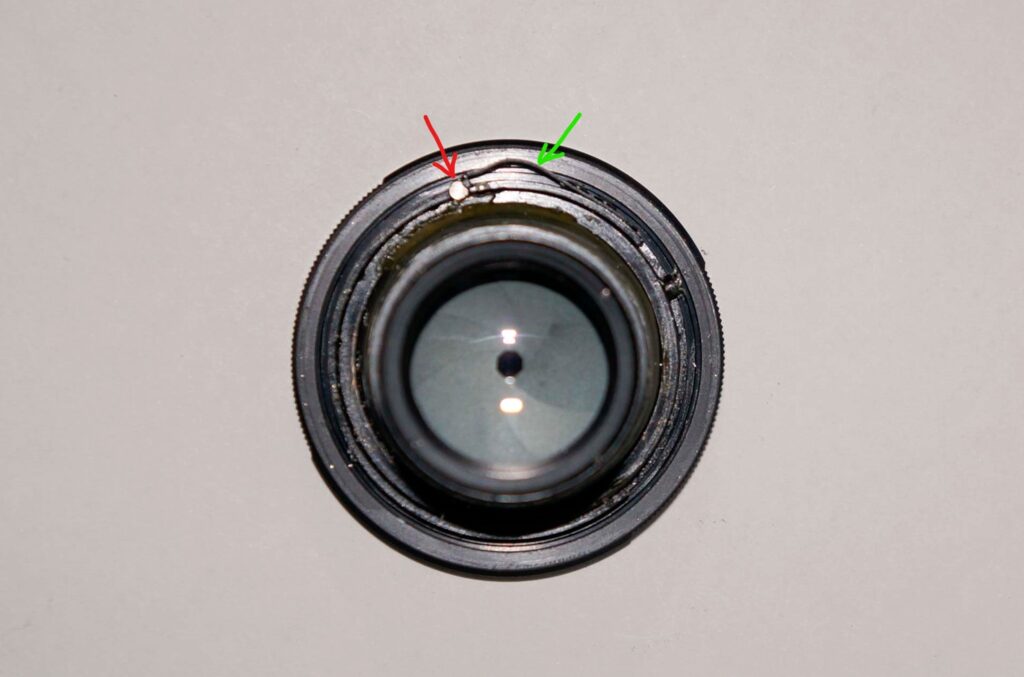
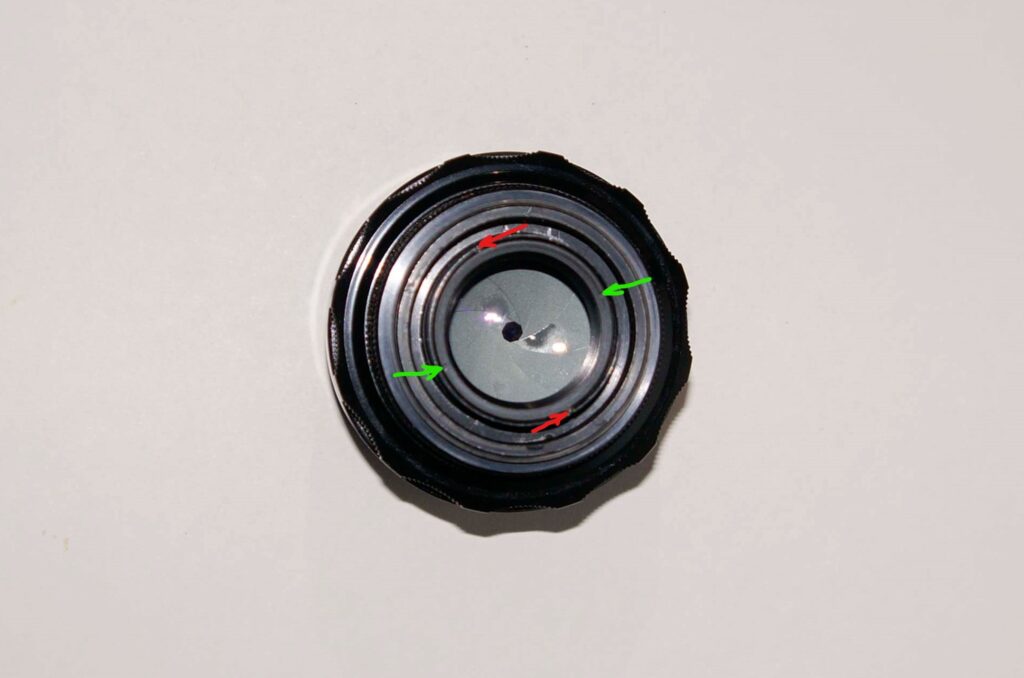
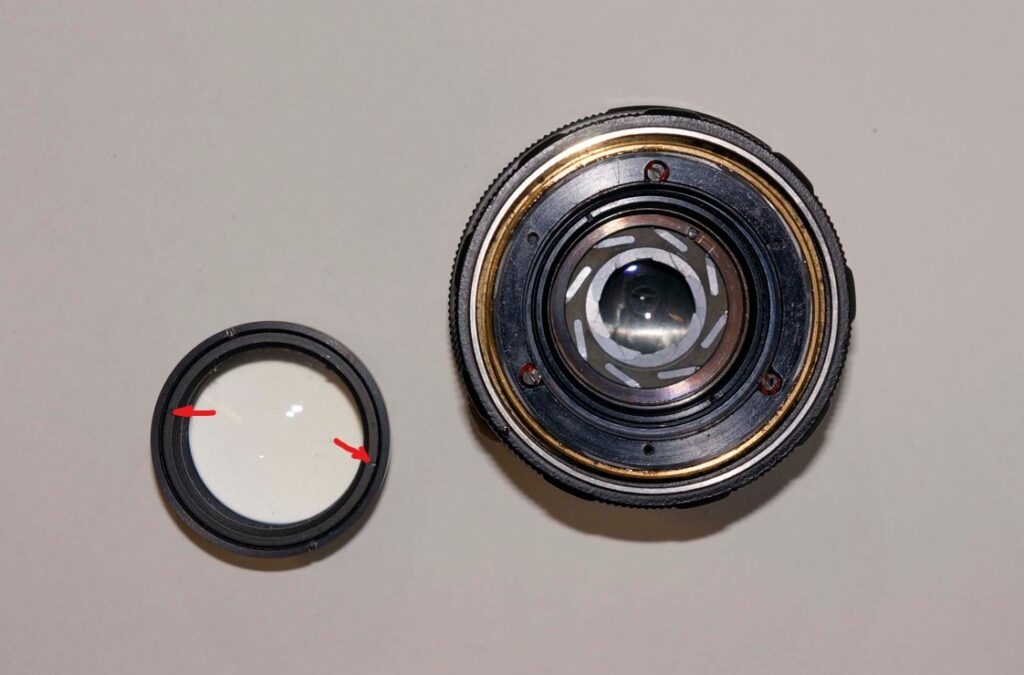
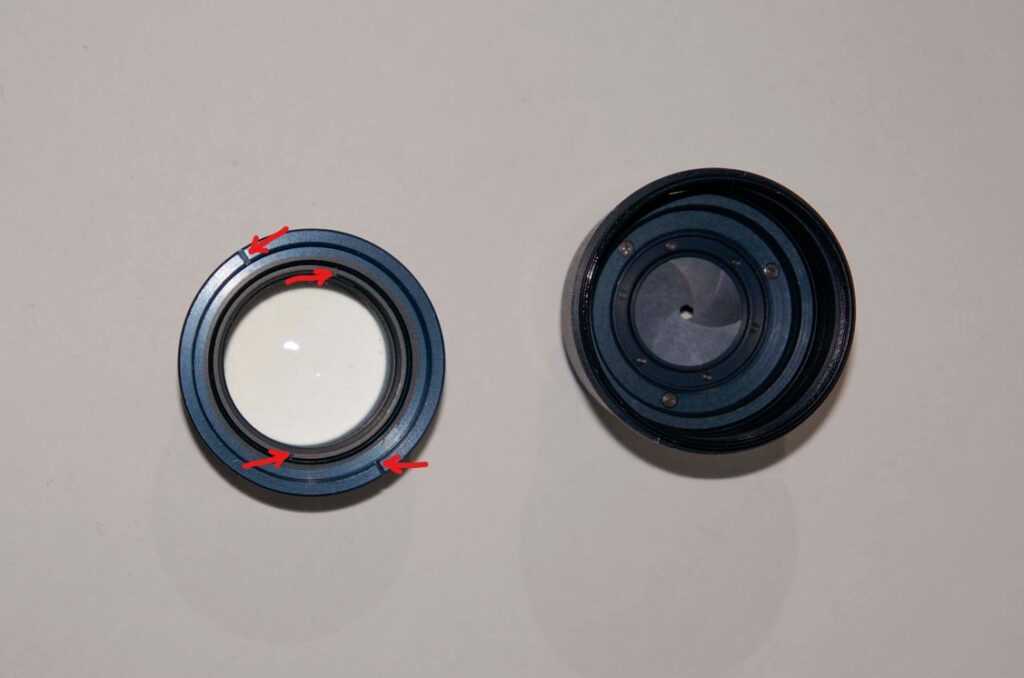
The lens was set to infinity focus as this makes it easier to access the rear elements. The rear group was removed by unscrewing the outer notched ring (red arrows) with a lens wrench and lifting the group housing out of the lens body.
Next the inner notched ring (green arrows) was unscrewed and it and the outer element were dropped out of the group housing.
Turning the group housing over, the notched ring was unscrewed allowing the inner element to be removed.
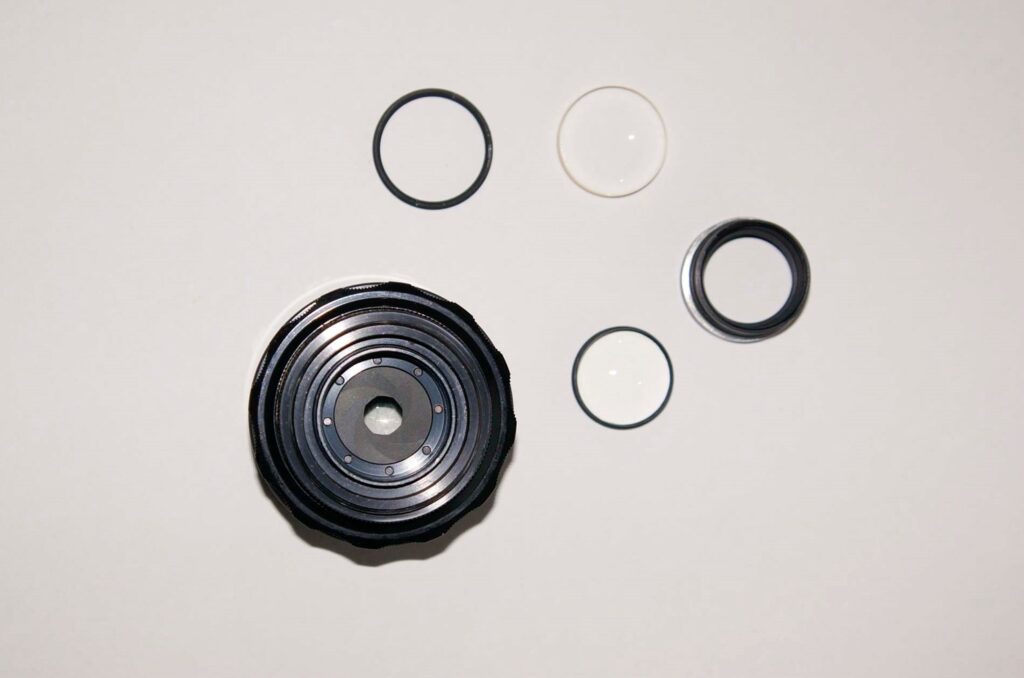
The lens elements were cleaned with lens cleaning fluid and a microfibre lens cloth. Dust was blown out of the group housing with a blower and other residues – you get a few after 50 plus years – were removed using cotton buds and isopropyl alcohol. Reassembly was simply the reverse of the disassembly steps.
Front Lens Group
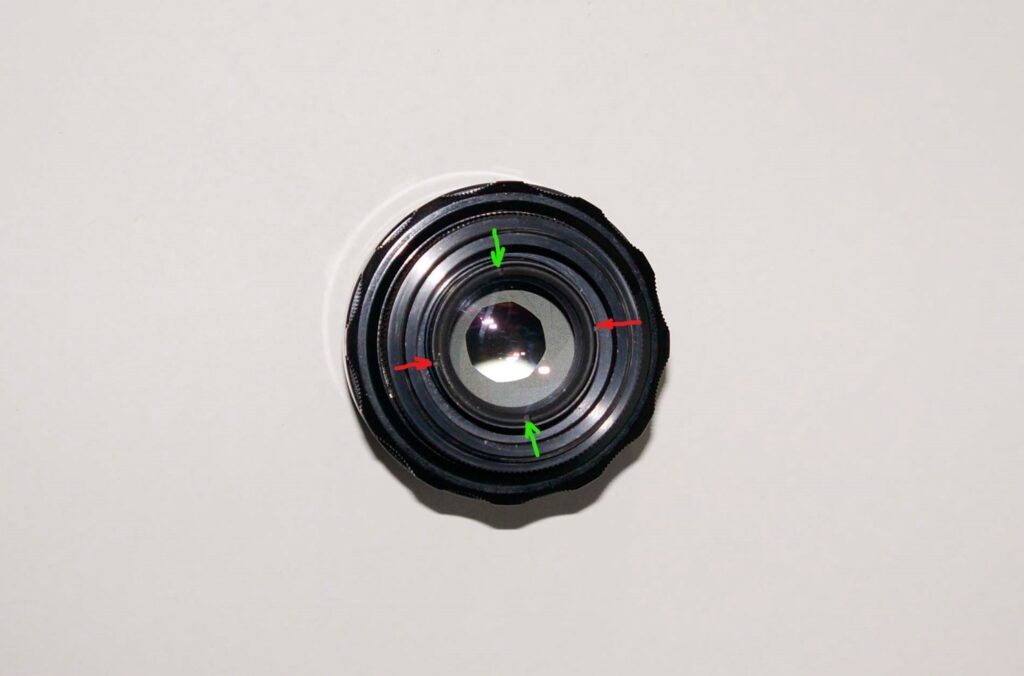
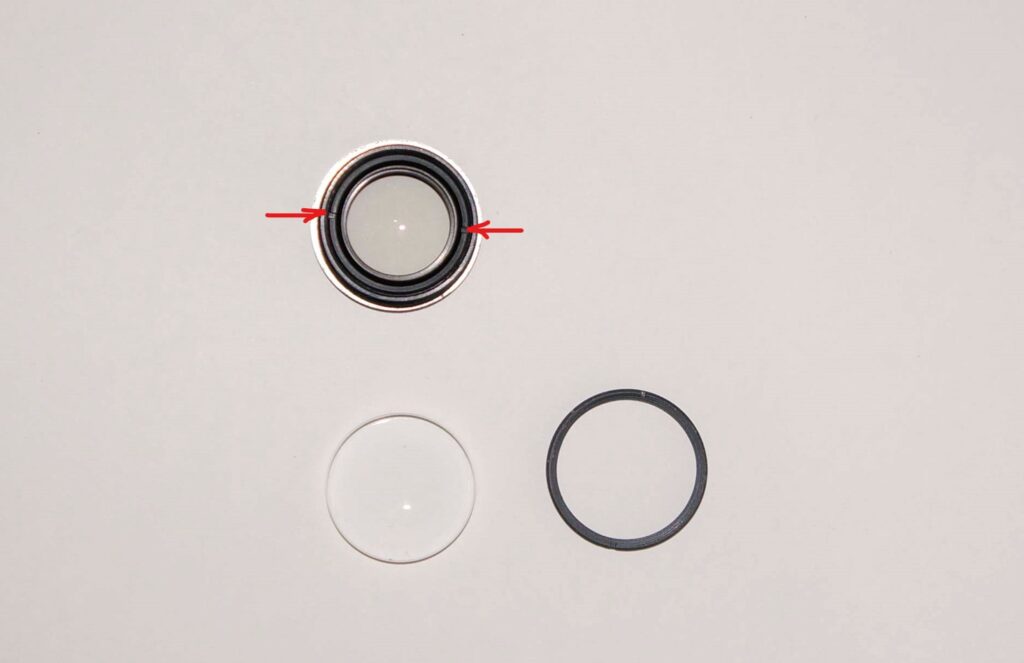
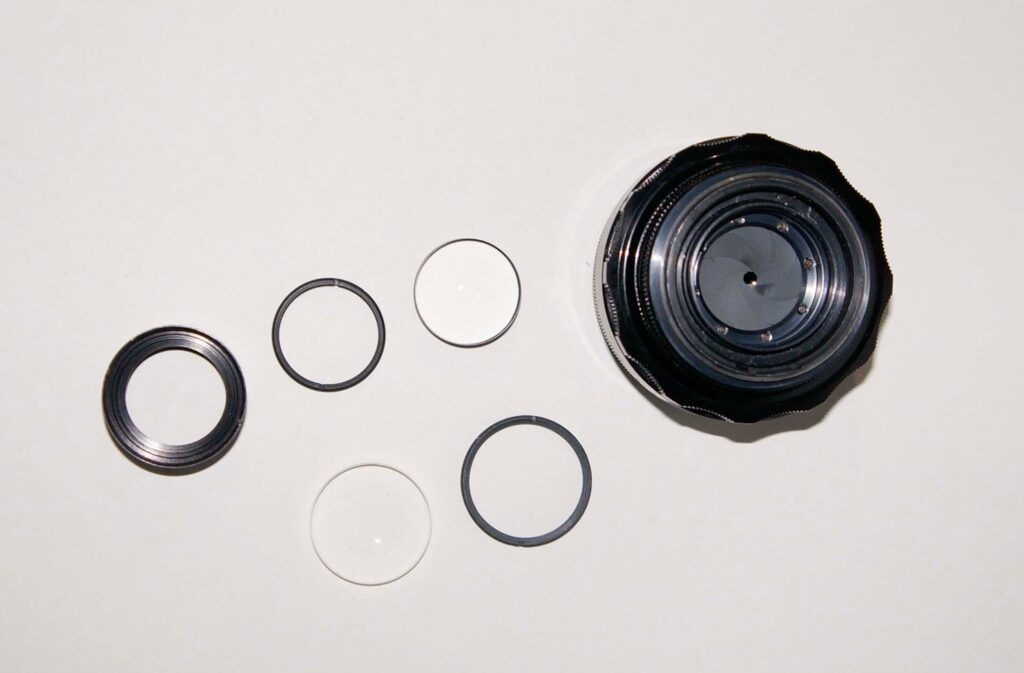
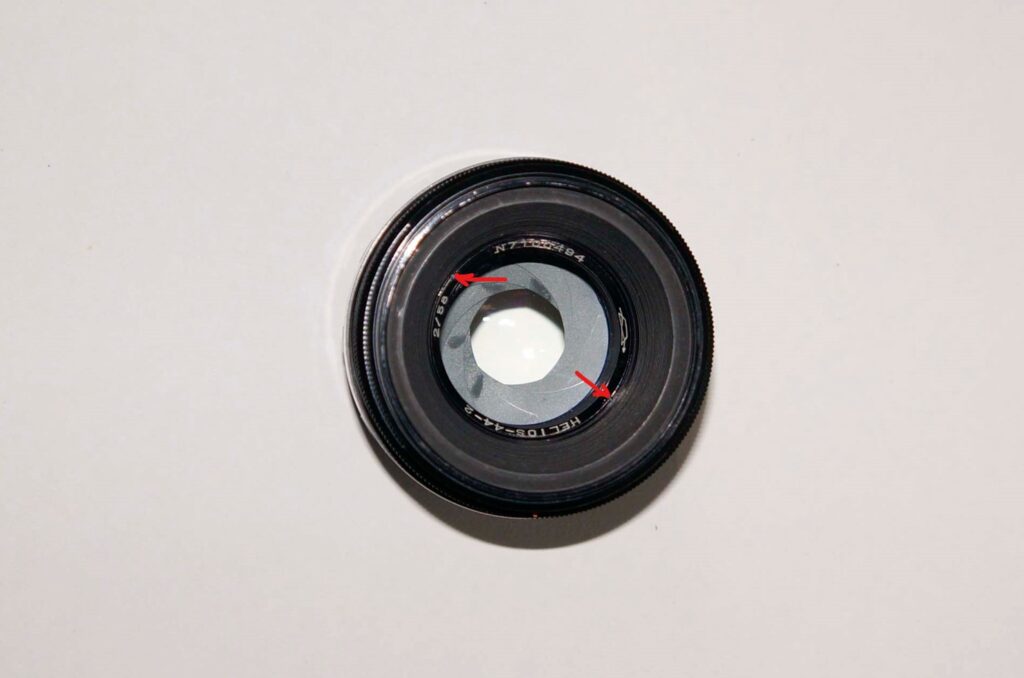
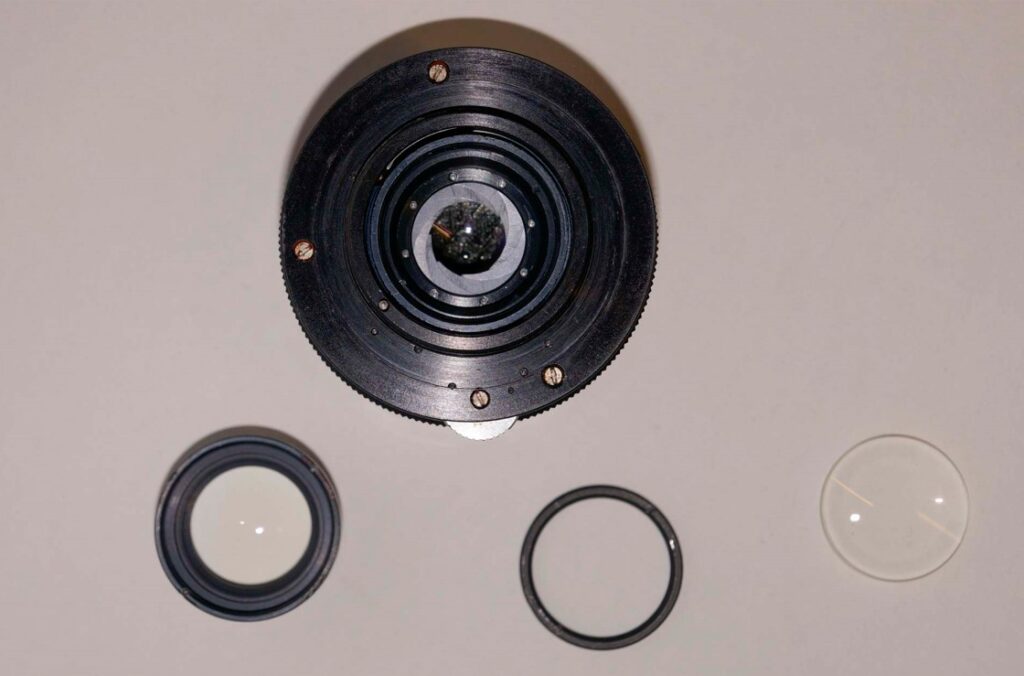
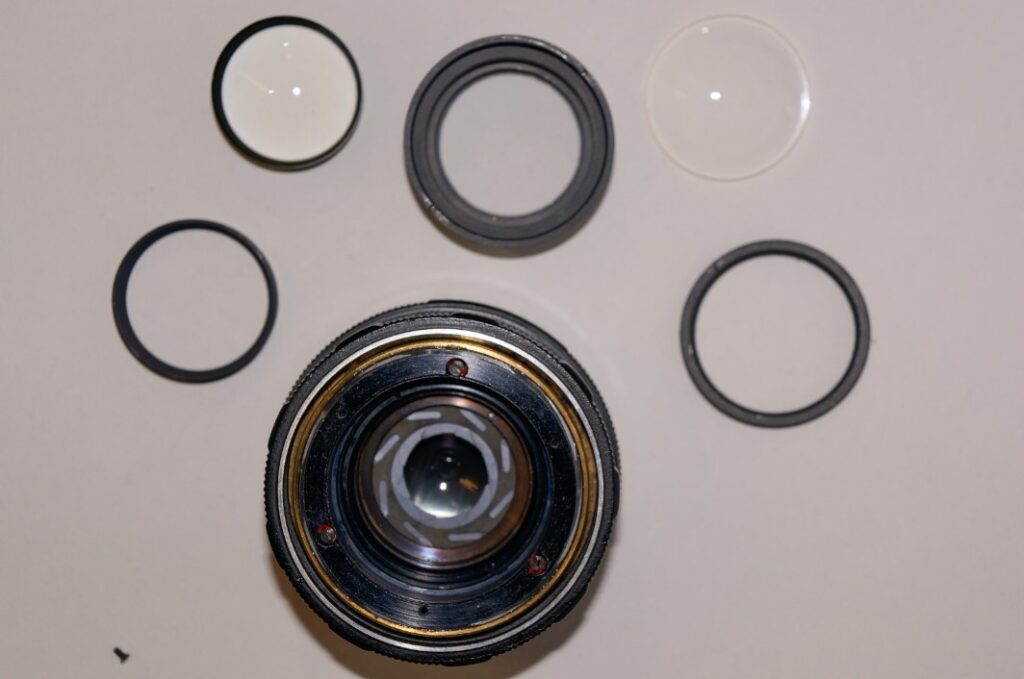
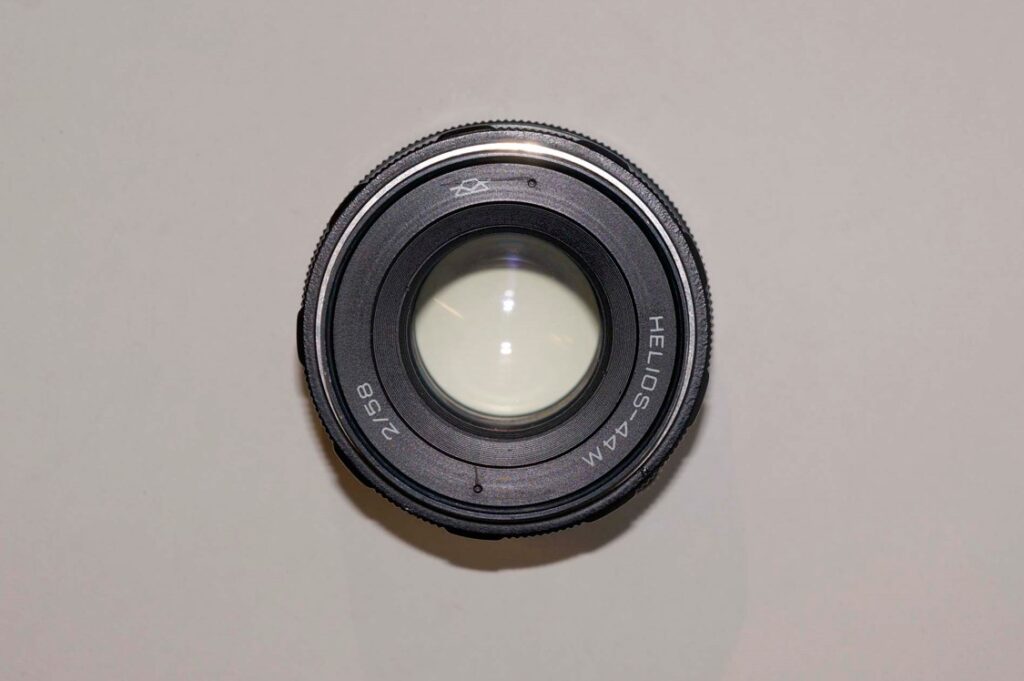
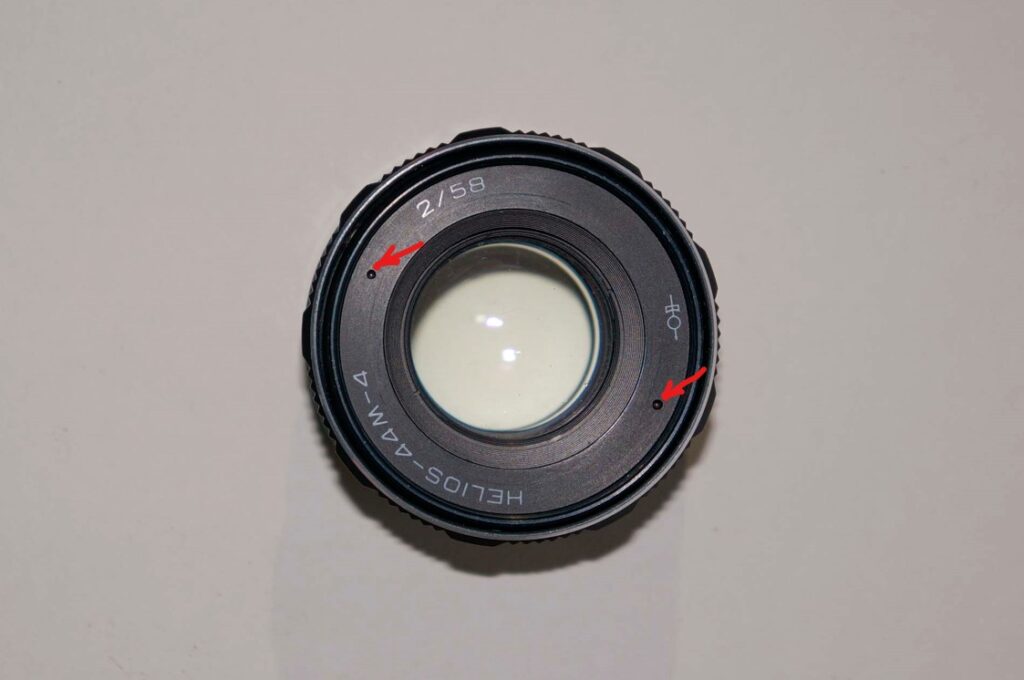
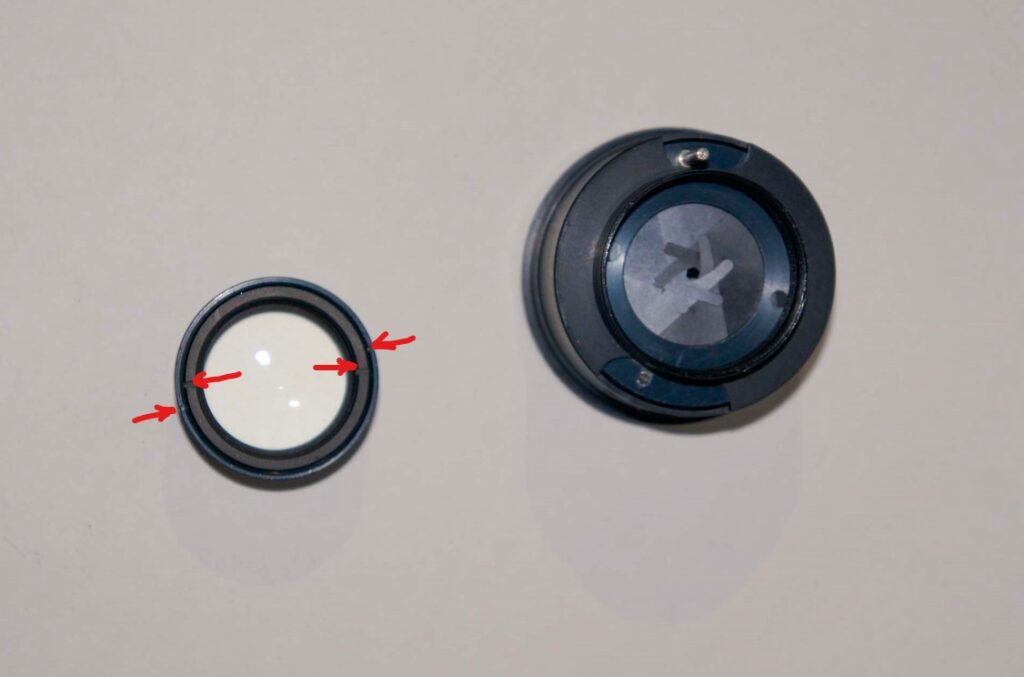
The front lens group on the early Helios 44’s is even easier to take apart than the rear group as there is no removable group housing. First the ring with the lens name, serial number, etc. was unscrewed using the lens wrench in the notches arrowed below. With this ring lifted out the front element was tipped carefully into a cleaning cloth.
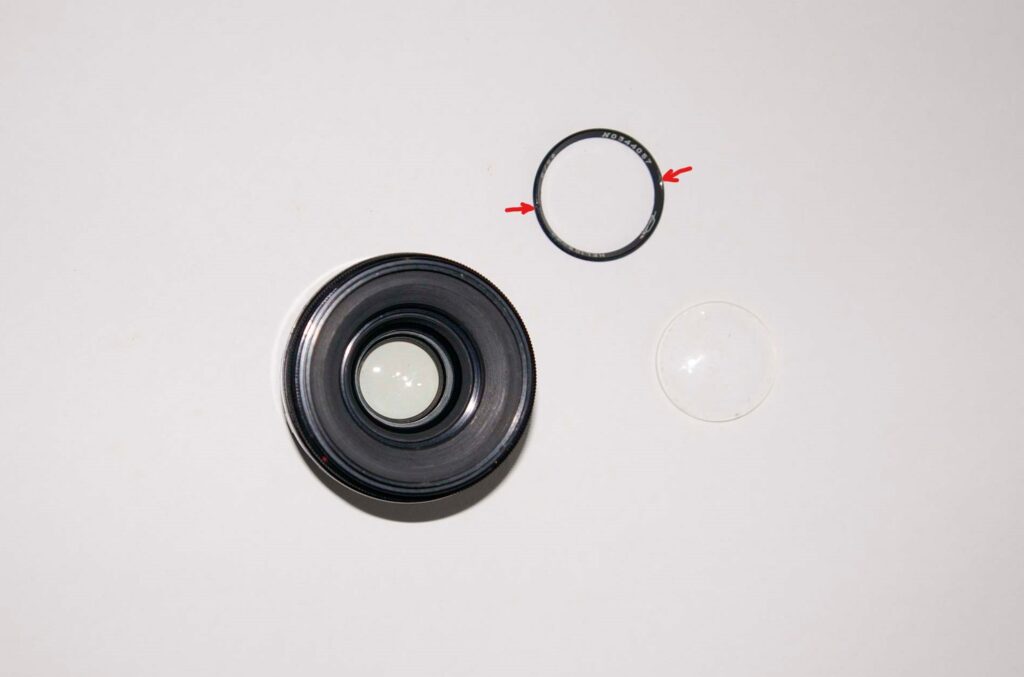
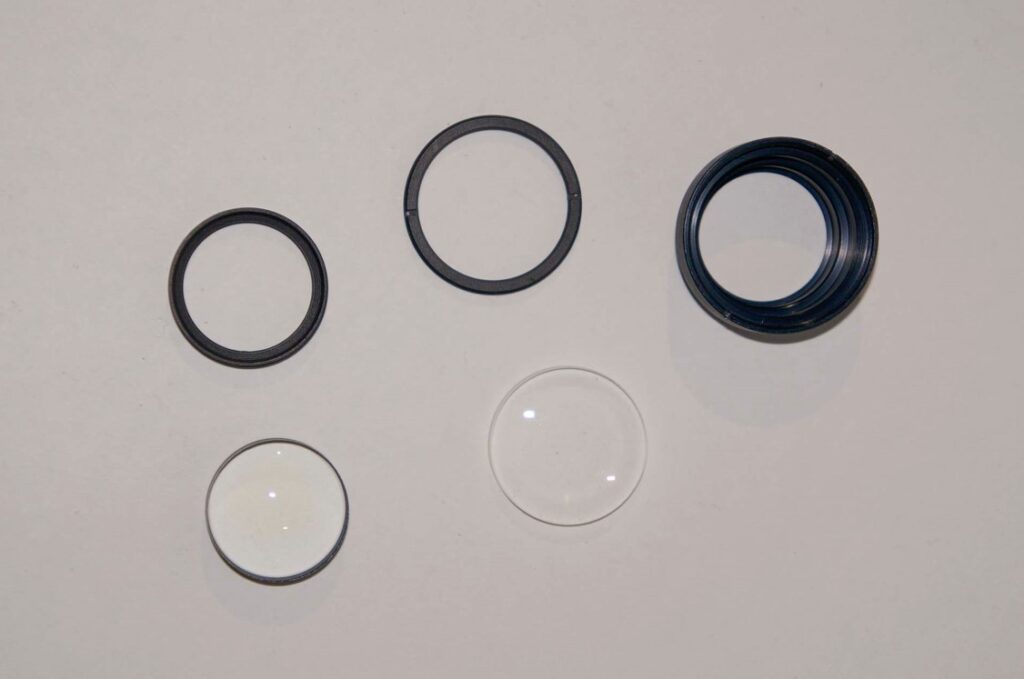
With a couple of taps on the body this was followed by a spacer and the inner front element. The disassembled front group is shown below.

All the components were cleaned as per the rear group. The front group was reassembled by dropping the inner element, spacer and front element back into place in the lens body and screwing the front ring back on. Pretty straightforward stuff!
Helios 44-2
Next the 44-2. Mine is a 1971 version that was again made by KMZ. Apart from the mucky interior, slightly oily aperture blades and very stiff aperture ring it was in very good condtion considering it’s over 50 years old. Externally it doesn’t look a lot different to the 44, although the stop-down ring and the ribbed ring beside the mount are both slightly wider.
As the 44-2 is almost identical to the 44 the method for taking it apart is the same, so the section on cleaning the lens elements is going to be very familiar if you’ve just read the one above. The oil on the aperture blades wasn’t heavy enough justify taking the aperture mechanism apart, I’m happy to say.
However, the very stiff aperture ring had to be remedied, so the next section describes the process for doing that.
Helios 44-2 Aperture Ring Cleanup
The first step was to separate the optical block from the focus mechanism. With the lens focused at infinity and holding the focus ring the aperture rings were unscrewed anti-clockwise (see arrows below) until the optical block could be taken out of the back part of the lens.
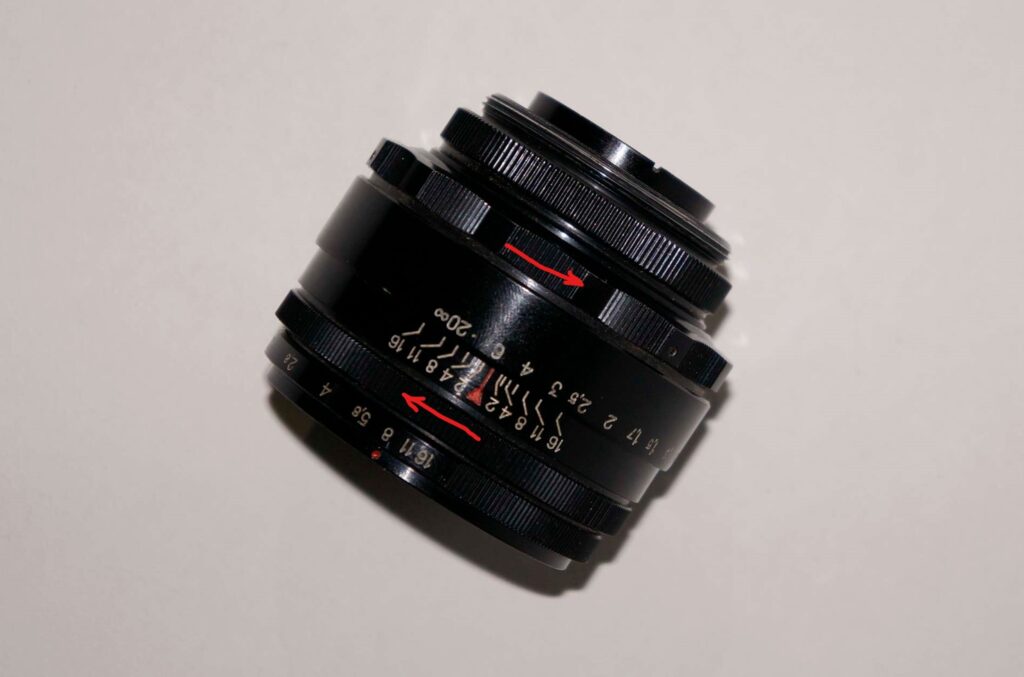
Since no work was needed on the focus mechanism this was set aside ready for reassembly, as was the alloy spacer from the back of the optical block (this shows up very white in the photo below).
Turning the optical block over there is one screw on the back – this was removed.
On the side of the optical block there are two slots (diametrically opposite). One of these has a screw in it – the position of this slot was marked on the barrel of the block, then the screw was removed.
At this point the back part of the aperture setting mechanism was unscrewed from the rest of the optical block. This revealed a lot of old grease on both parts, along with a serious amount of alloy swarf on the back of the aperture ring.
The worst of this was cleaned off, before the sprung clip (green arrow) was removed along with the steel roller (red arrow) that provides the click when setting the aperture.
One thing to note in the image above is the position of the clip relative to the roller. The clip was removed by unfastening the two screws arrowed below:
Cleaning and Reassembly
With that removed the swarf and grease were cleaned off the back of the aperture mechanism. The slots the roller engages in to provide the aperture clicks were also degreased. It all came up looking pretty clean after the application of a bit of isopropyl alcohol, so I didn’t have to disassemble the optical block any further.
Reassembly was pretty much the reverse of disassembly, but with the application of new grease on various parts. Putting the spring clip back, referring to the earlier back view picture (3rd above), I moved the clip slightly to the left so that the body of the clip is over the roller, and the lug stopping the roller from sliding out is at the other side of the roller. This seems to allow the roller to move more easily, probably contributing to the smoother movement of the aperture ring since the cleanup.
The preset aperture ring was set to f16 before the back part of the aperture was replaced. It was screwed in until the slot with the screw hole aligned with the marks on the lens barrel and the same amount of thread was showing behind it as when it was taken off:
The screw was then replaced in the slot to lock it in place. With the optical block reassembled the spacer was put the back on before screwing it into the focus mechanism. Since the cleanup the aperture clicks are very smooth and don’t require much pressure.
Helios 44-2 Optics Disassembly, Cleaning and Reassembly
Rear Lens Group
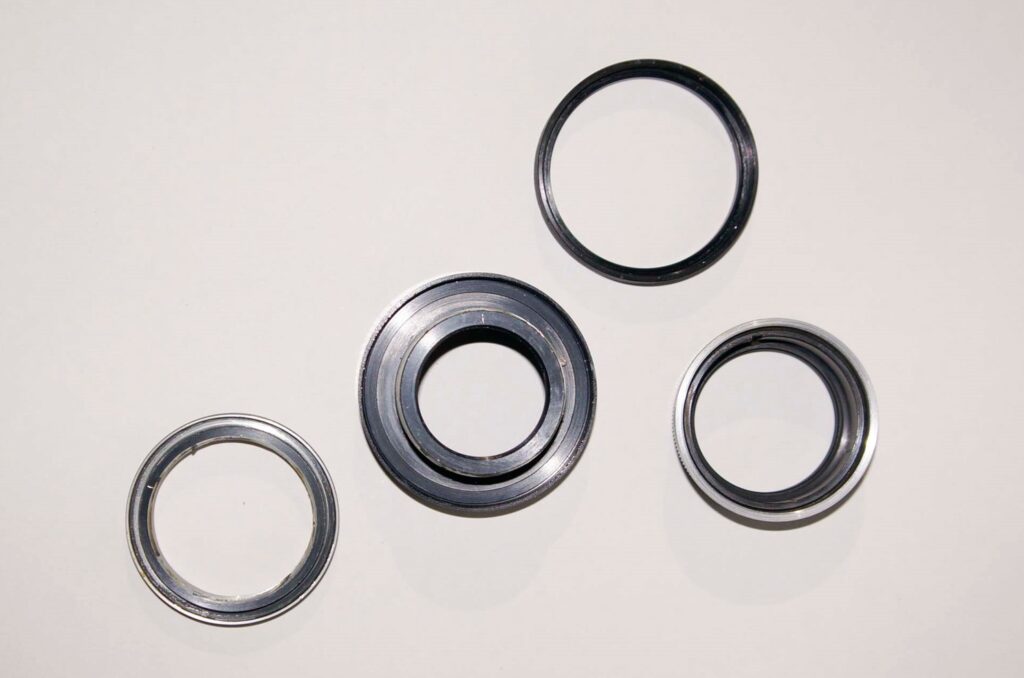
The rear group was taken by unscrewing the outer slotted retaining ring (red arrows), then releasing the rear element by unscrewing the inner ring (green arrows):
The group housing was then turned over and the slotted ring unscrewed to release the inner element:
… giving this familiar selection of parts:
After the lens elements were cleaned, the housing had dust blown out with a blower and the group was reassembled. Before screwing it back into the lens body the oily aperture blades were dabbed gently with a cotton bud to remove some of the excess oil to hopefully avoid it spreading further.
Front Lens Group
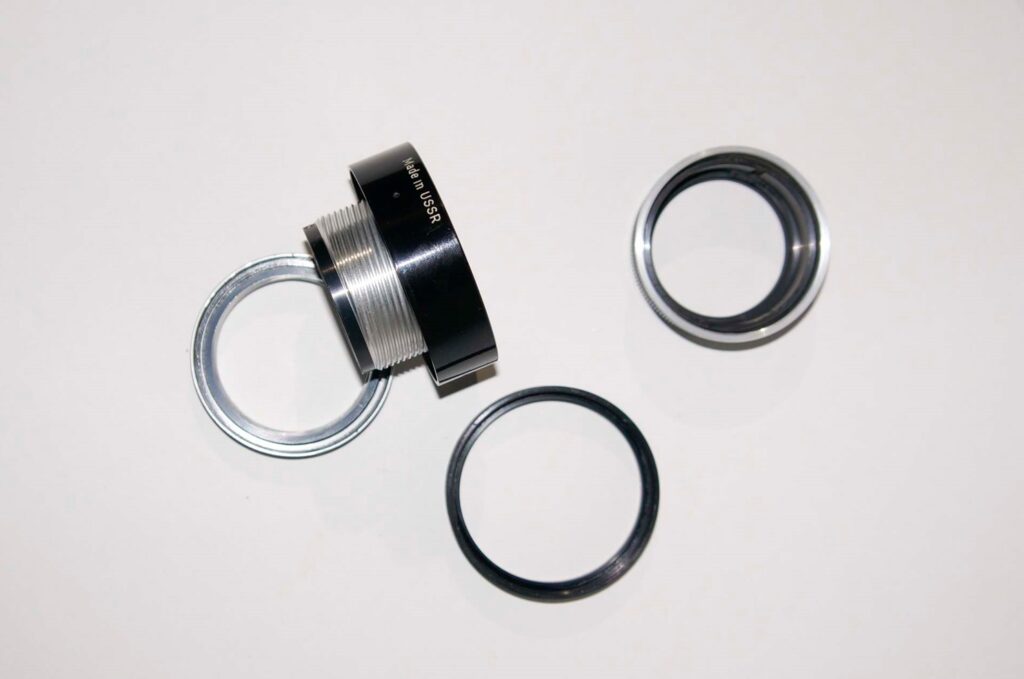
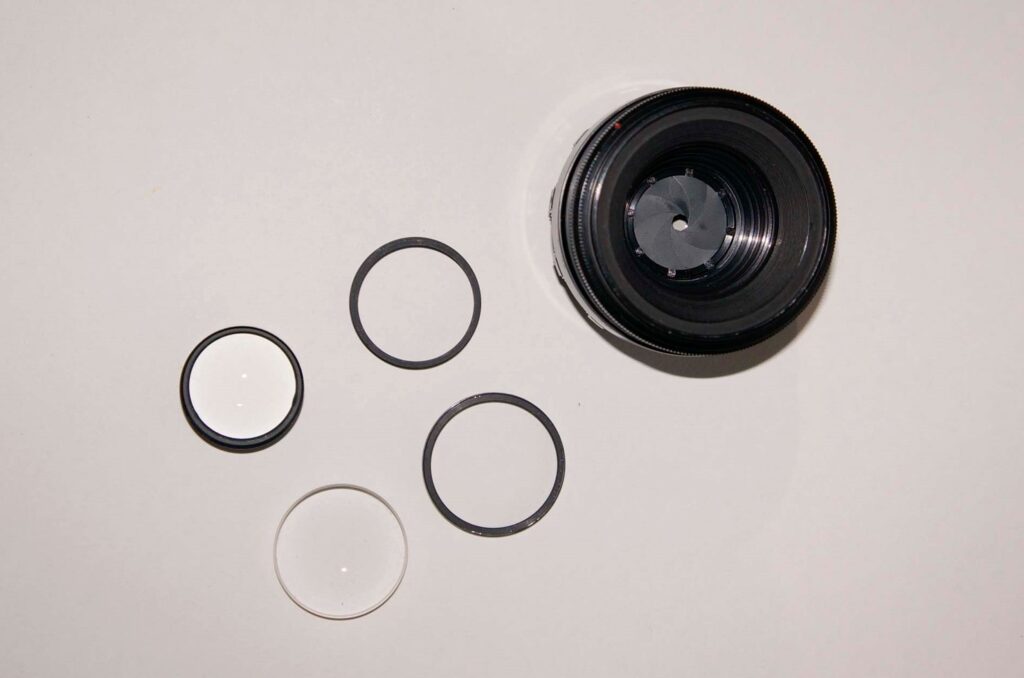
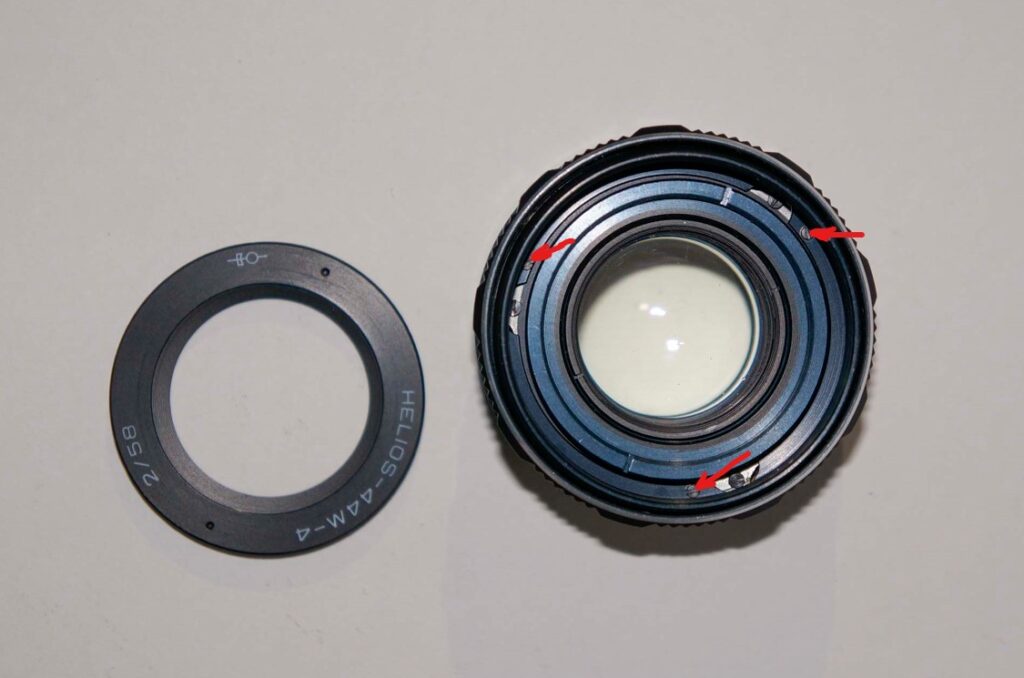
Once again this was just a case of removing the slotted ring with the lens name and factory logo by unscrewing it with a lens wrench:
…then carefully tipping out the front element, spacer and inner element.
The lens elements and rings were cleaned, and before reassembly the front of the aperture blades had excess oil removed with a cotton bud.
That’s it for the 44-2: the process would have been a lot more involved if the amount of oil on the blades was greater. I haven’t yet taken apart and reassembled one of these aperture mechanisms – that may be a joy yet to come.
Helios 44M
My 44M is a 1981 version, once again built by KMZ. While it’s optical construction is the same as the earlier versions, physically it is significantly different to the 44-2. The main external changes make the 44M look like a typical 70’s to 80’s style manual focus lens. The aperture ring has been moved to the back (and there’s only one of them), there’s an automatic aperture coupling pin on the mount with auto/manual switch, the focus ring is thicker and the size of the filter thread increased to 52mm (from 49mm).
Helios 44M Disassembly
As I said at the start, the 44M is a very different beast to the 44 and 44-2 mechanically, so at this point the disassembly methods diverge a little. However, the good news with my copy of the lens was that the focus action was smooth, the aperture ring wasn’t tight and the aperture blades weren’t showing any oil. This meant that I only had to remove and clean the lens elements rather than taking the whole thing to pieces.
Rear Lens Group
The rear lens group was removed by unscrewing counter-clockwise using a lens wrench in the outer set of slots (circled below):

This removed the whole rear lens group from the lens body:

The rear lens element was then removed from the group using the lens wrench in the inner set of slots (circled above). After a few turns the retaining ring came away and the lens was dropped out of the housing, taking note which lens face was outwards. The lens body with rear group housing, retaining ring and rear lens element can be seen below:
That’s as far as the rear group disassembly needed to go as I could now access both sides of the elements for cleaning.
Front Lens Group
The first step was to apply the lens wrench to the two holes in the front plate and turn counter-clockwise.

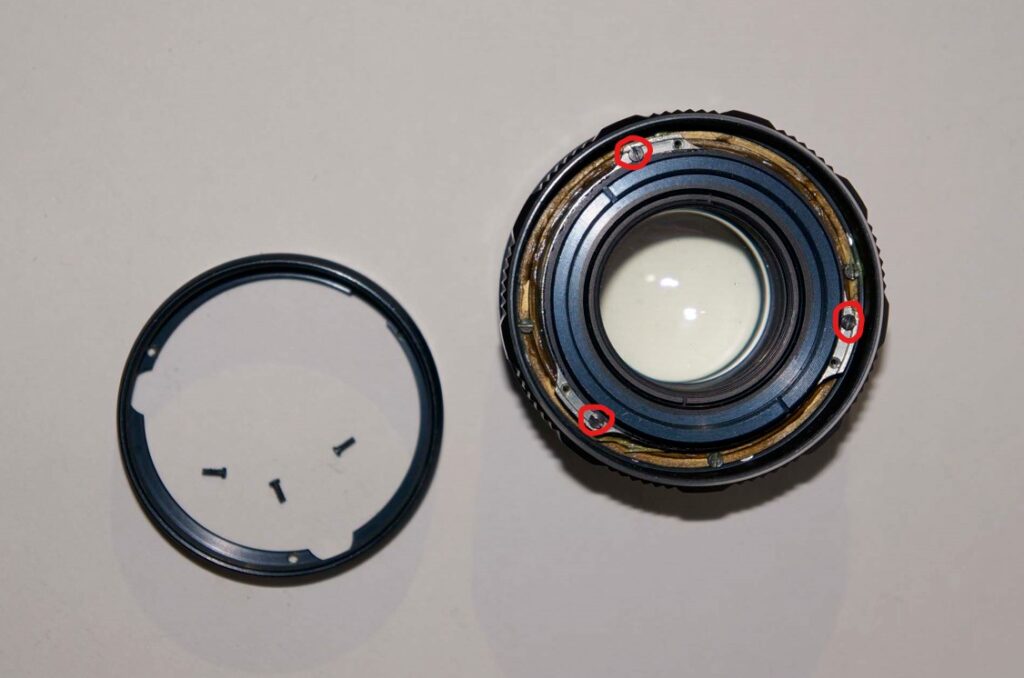
This allowed the front plate to be removed, revealing three screws and a pair of slotted rings. The screws were removed, allowing the removal of the ring they were holding in place:
At this point the lens looked like this:
The outer of slotted ring (circled) was unscrewed using the lens wrench. This allowed the front lens group to be removed from the lens body.
Finally, by applying the lens wrench to the slots in the inner ring and unscrewing, the retaining ring and front element, followed by the spacer and back element could be removed from the group housing:
Note that it all looks a bit greasy further into the lens body. However, since the focus ring was running smoothly and the aperture blades were oil-free there was no need to take the lens apart any further. If it isn’t broken, don’t fix it!
Cleaning and Reassembly
The lens surfaces were cleaned with lens cleaning fluid and a microfibre cloth. In this lens there were no stunbborn bits that needed anything stronger. The insides of the group housings had dust blown out of them with a lens blower, and a cotton bud with isopropyl alcohol was used to remove any particles that had stayed stuck.
Reassembly was just a case of reversing the steps used to remove the lens elements. This lens only needed a fairly ‘light’ level of disassembly, so there were no tricky realignments or tiny screws to fiddle with (drop/lose). I was very happy not to have to go helicoid hunting on this one – I’ve seen the procedure and it doesn’t look particularly easy.
Helios 44M-4
This 44 is the newest of my collection, dating from 1986 and built at the Valdai factory. It looks and feels quite modern – as in 1980’s-manual-focus-modern. The focus ring is wider and there’s no manual aperture stop-down option. Another significant difference between the 44M-4 and the ealier models is the number of aperture blades – the M4 has six, while the 44, 44-2 and 44M have eight. The blades on my copy were clean and oil-free, which suggests I might have got lucky with this one. The Valdai factory has a reputation for build quality issues, one of the common failings being oily aperture blades.
As I said in the introduction the focus ring on my 44M-4 was very stiff and uneven, so I once again some helicoid cleaning was required. Two in four lenses, how lucky is that?
Helios 44M-4 Helicoid Disassembly and Cleaning
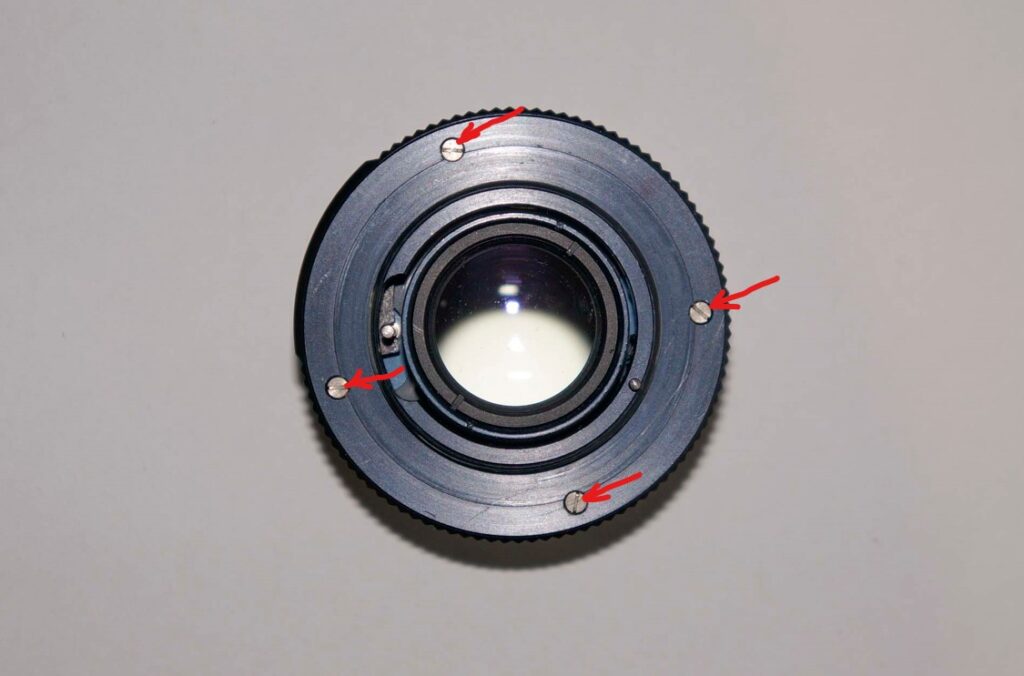
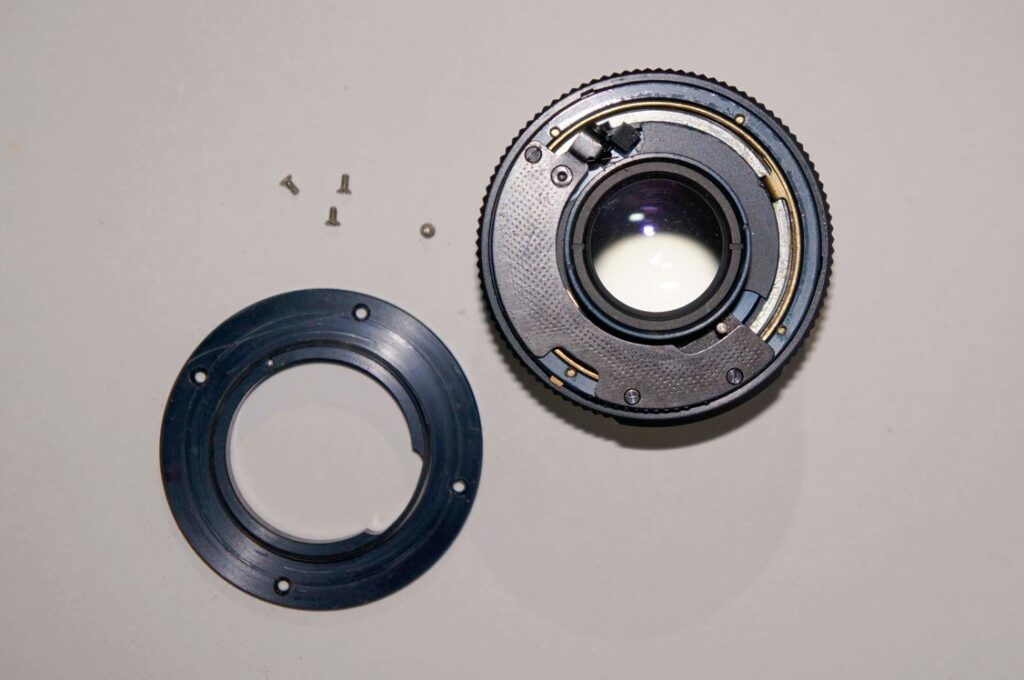
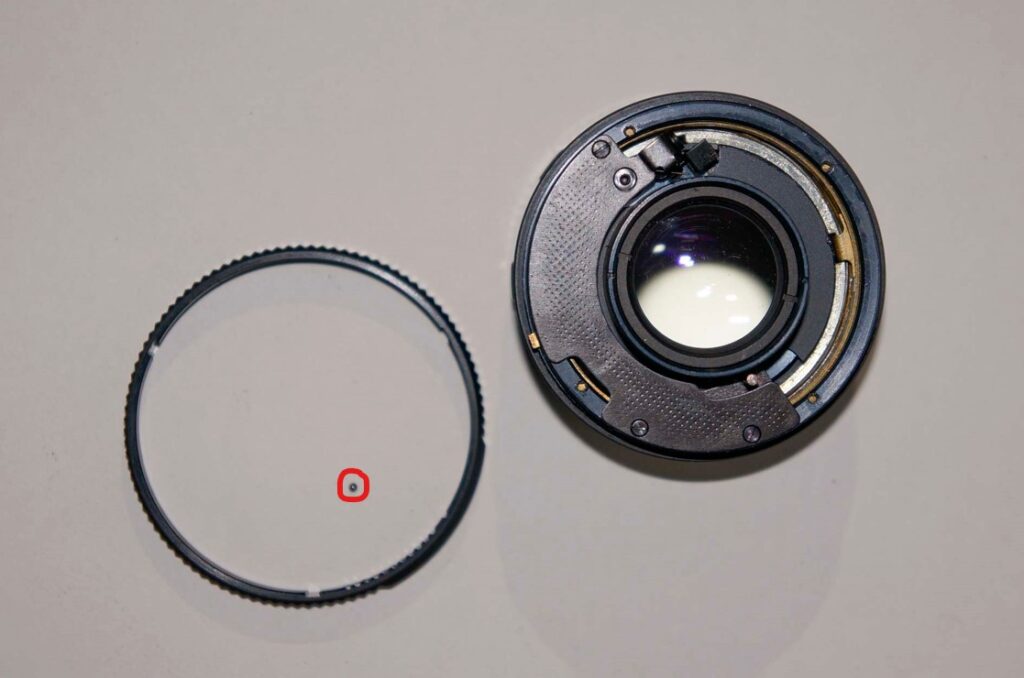
Because of the need to get to the helicoid this was a more extensive strip-down than some of the previous lenses. If only the lens elements had needed cleaning this could have been done with the optical block in situ (so skip over most of the next section). The starting point was the removal of the optical block with both lens groups. To do this first the mount was removed by taking out the four screws on the back of the lens:
then lifting the mount clear:
After this the aperture ring was lifted off, taking care not to lose the tiny ball bearing that provides the aperture click action.
To de-click the aperture, reassembly without the ball bearing would do the job.
Next, turning to the front of the lens, the decorative ring was removed using the lens wrench in the two indents:
This revealed six screws around the front of the lens block – two sets of three. At this stage only the three holding the inner front housing (arrowed below) needed to be removed:
Access to these screws is fiddly, but with a decent jewellers screwdriver getting them out wasn’t a problem. With the screws removed the inner housing could be lifted away, revealing the inner workings of the lens, and a lot of old grease.
The optical block is held in place by the three screws circled above. Before removing them I scratched an alignment mark on the optical block and lens body to make lining things up during reassembly easier.
Turning the lens body on its side there were three screws just beside the aperture scale ring where the aperture adjustment ring was prior to removal. One of these is shown below:
These were removed to allow the back part of the body to be removed.
Notes for Reassembly:
The part on the left is the block with focus ring and helicoid. There are a few things worth pointing out at this stage:
- Referring to the left part: the two arrowed guides didn’t need to be removed to get the helicoid apart, but were subsequently removed to make reassembly easier. The screws holding them only needed to be loosened as the guides are slotted and can be slid out and back into position during reassembly.
- Referring to the right part: upper arrow is pointing to the brass tab that sets the lens aperture. The lower arrow is pointing to the hook that has to engage the aperture pin at the back of the lens block during reassembly.
Finally the focus limiter was removed by removing the small screw and metal plate:
The helicoid could now be unscrewed until the focus mechanism could be taken apart. This was done slowly and the helicoid position was marked just prior to removal to assist with alignment for reassembly.
Helicoid Cleaning and Reassembly
The old grease was cleaned out of the threads using isopropyl alchohol and a toothbrush, with a bit of finishing with a cotton bud. The threads were then re-greased with a small amount of helicoid grease and run up and down a few times to ensure they were running smoothly.
Reassembly was pretty much a reverse of the above steps, but there were a few tricky bits. First the copper and brass guides were removed to make getting the helicoid to engage easier – I’m not sure if it’s possible to reassemble the helicoid with them in place.
Getting the helicoid in the right position is slightly tricky and it took a few attempts as there are several start points in the helicoid threads. It was fairly obvious when it was assembled correctly looking at the engagement of the focus limiter and the position of the guides in the slots in the helicoid.
The final tricky bit was getting the optical block’s orientation correct before fixing it back in the body: as I noted above it was necessary to get the aperture actuator aligned correctly. The marks I made during disassembly made this a lot easier, but it was still fiddly. Beyond that the rest of the rebuild was pretty straightforward.
44M-4 Lens Glass Cleaning
If I’d only needed to clean the lens elements, most of the disassembly above would have been unnecessary, as the retaining rings for lens groups and their outer elements can be accessed with the lens intact (apart from the removal of the front decorative ring). However, the steps to access and clean the elements are the same whether the optical block is in the lens or out.
The front group housing was removed by unscrewing the slotted outer ring on the front of the optical block. With the front group housing out the slotted inner retaining ring was unscrewed and removed.
The outer element, spacer and inner element were then removed from the housing for cleaning.

Turning the optical block over, the rear group housing was removed by unscrewing the outer ring and lifting it out of the optical block, then unscrewing the inner ring to release the outer element, followed by the spacer and inner element.
There was nothing particularly nasty on any of the glass, so they didn’t need any more than lens cleaning fluid, a microfibre cloth and a gentle final polish with a lens pen. After cleaning the front and rear groups were reassembled and refitted to the optical block.
Summary
That concludes the lens cleanups. It was possibly a little more work than I’d expected at the outset, with two helicoid regreases and one aperture ring stripdown as well as the glass cleaning, but the mechanics of all four lenses now work very well.
Since the optical design of the different versions of the Helios 44 is the same, the method for breaking out the lens elements for cleaning is very similar. The shape and ease of use of the slotted locking rings does vary and some of them require the points of the lens wrench to get perilously close to the glass elements. On the 44 and 44-2 I used the back of a vernier caliper rather than the lens wrench to get the front rings off, as it was easier to set and control in such close proximity to the front element.
Note: if you prefer your instructions in video form it’s worth taking a look at the Retro Foto House YouTube channel.
Out to Play
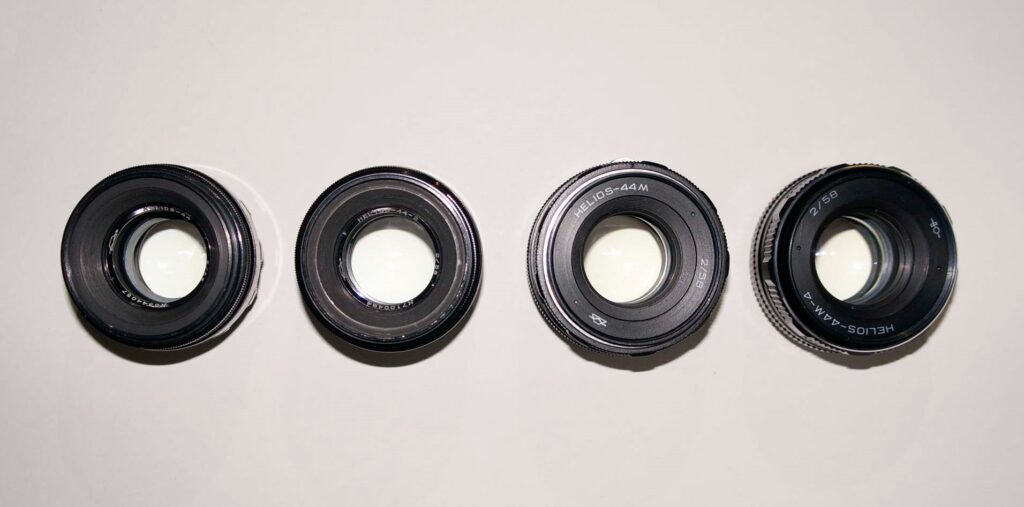
With all that workbench stuff done I had a set of four reasonably clean and smoothly operating Helios 44’s to try to compare:
This was not intended to be a technical/lab test, but to ensure I took the ‘same’ photo with each of the four lenses the camera was tripod mounted. I used a flanged M42 to EF adapter so the ‘all auto’ 44M-4 could be used at all apertures. This wasn’t an issue with the other lenses as the 44 and 44-2 have to be used with preset apertures and the 44M has a manual aperture option.
All shots of each subject were taken in rapid(ish) succession – the limitation being the time taken to change M42 screw-mount lenses. They’re not as quick as bayonets!
While I was cleaning and regreasing the 44 collection the weather was great. Typically, as soon as I was ready to take the lenses out for a test it turned, with near gale force winds and rain. So not ideal for encouraging me to get out, especially when I was going to be exposing the internals of my camera to lots of slow lens changes. As a result I had to re-jig my plan slightly.
Indoor Macro
Not one of the original comparisons on my list, but in these weather conditions… Attaching the lens to a 38mm extension tube makes the 44 a pretty useful macro lens. Still trying to demonstrate the 44’s bokeh capabilities I focused on the centre of the flower, with a fairly wide aperture of f4 and a reasonably distant (in macro terms) background. The shots were lightly processed in Lightroom with identical settings. The results came out looking like this:
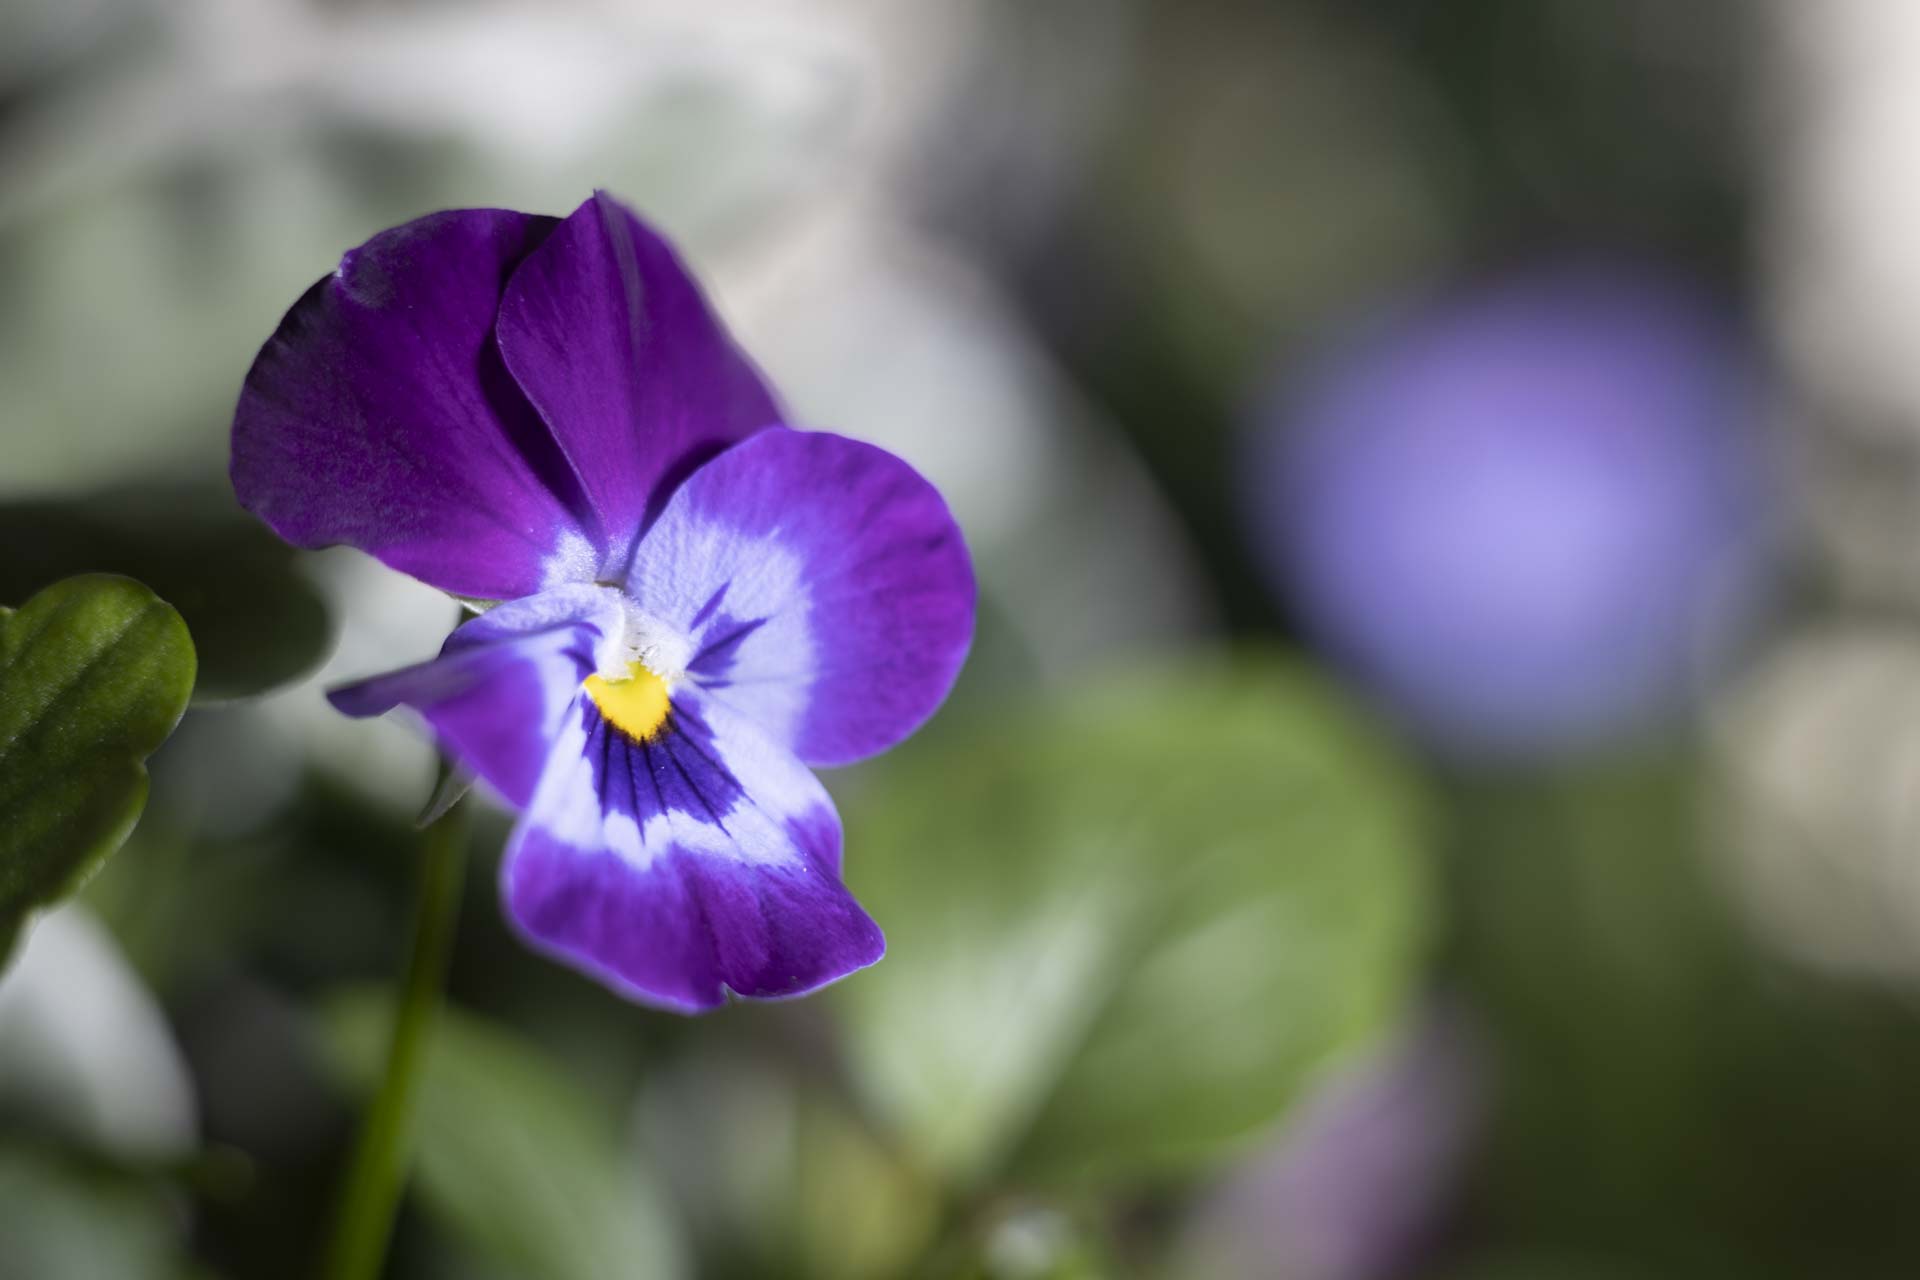

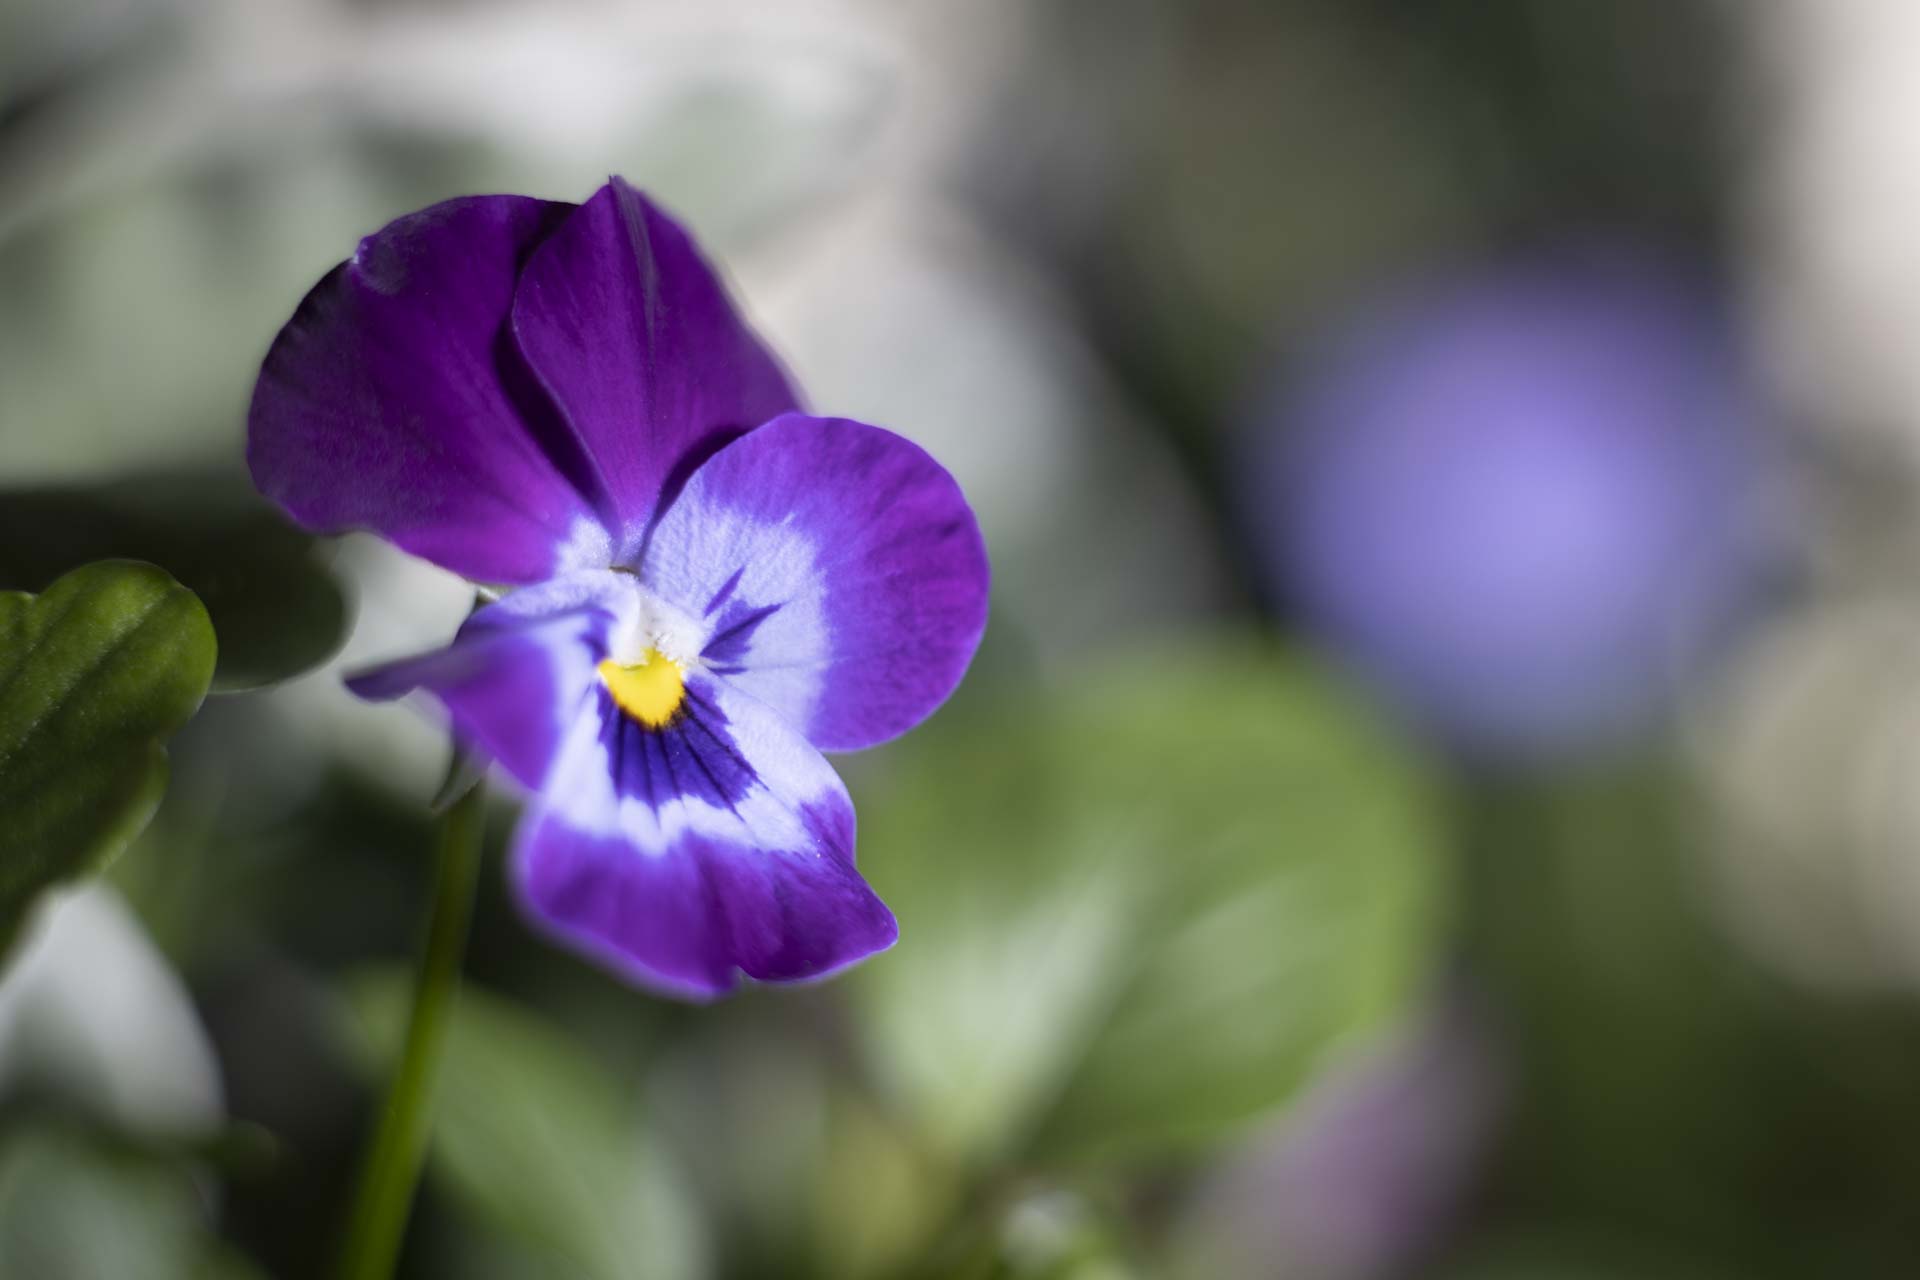
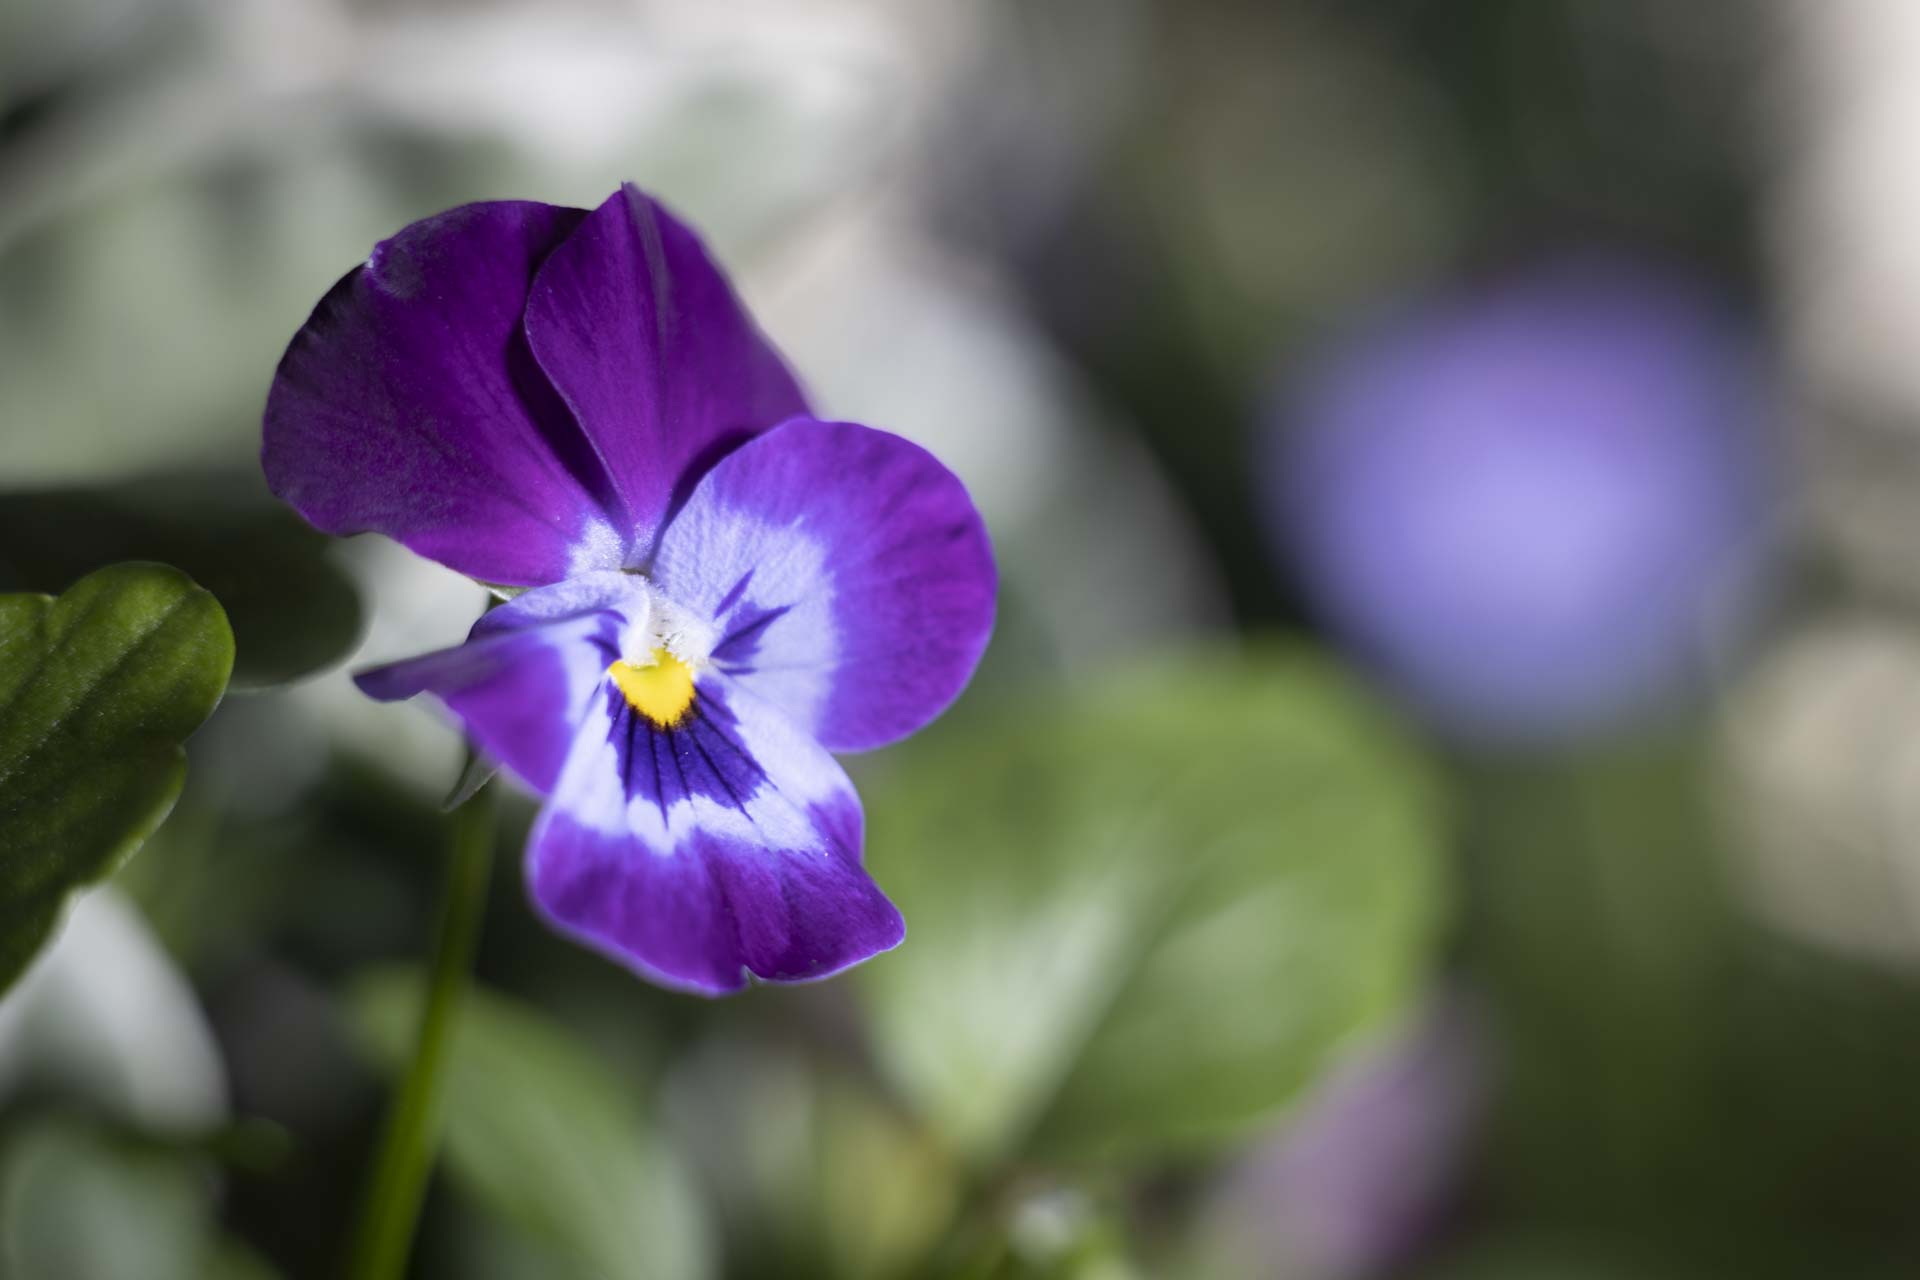
Not much to choose between them, although I think the prize for the roundest bokeh goes to the 44, and the least round to the 44M-4. It’s definitely showing the reduced number of aperture blades in the bokeh to the right of the frame – very hexagonal!
Infinity Focus
It’s not a particularly exciting test, but the next comparison I wanted was an idea of how the centre sharpness at infinity focus compares. All shots were taken with an aperture of f2.0 to see what can be expected with the lens wide open:


Best of the bunch looks like the 44M-4 followed by the 44-2 and the 44. General contrast and sharpness for the 44M seem to be the lowest of the four.
While centre sharpness wide open may not seem like a such big deal, to get the swirly bokeh effect the lenses are going to have to be used at a wide aperture setting if not wide open. Sticking the main subject in the centre of the frame while the background swirls around is only going to work if the subject is at least moderately sharp.
Lens Flare
Not too much of an issue, this one – I know that pointed into the light these old single-coated lenses are going to be pretty poor at controlling flare. The solution: don’t point them at the light…
However, just to see what the flare they produce does look like I went up into the hills, waited for a shower to blow through and took a set of shots more or less directly into the light. Aperture was set at f4.0 for all shots.
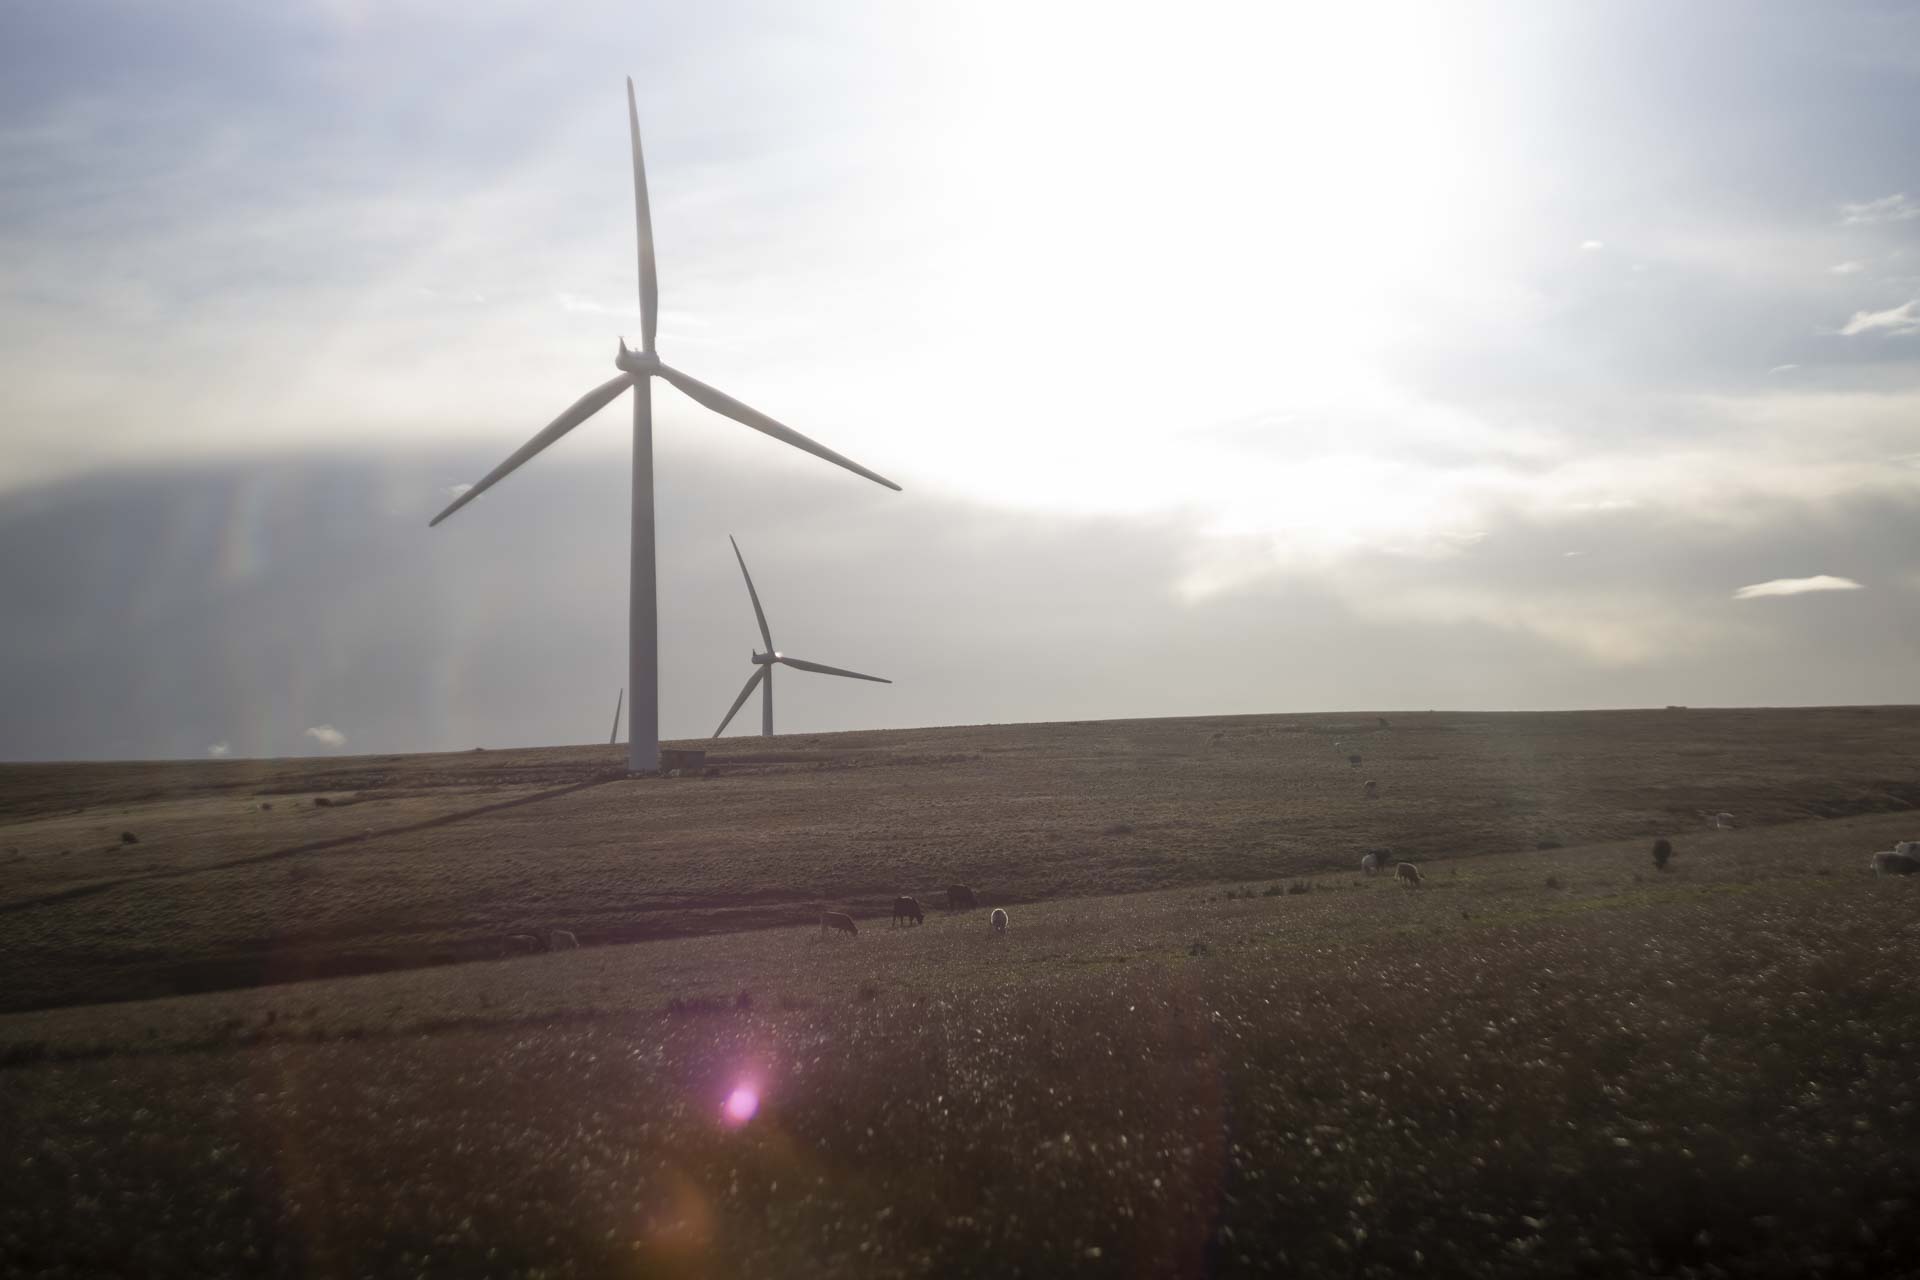


The results are interesting. As expected they all deal with flare poorly – possbily the most usable, to my eye, is the 44-2, which at least produces round flares. The 44 is similar but with the addition of other flares all over the image, the most novel being the set of prismatic ones up the left hand side of the frame. The 44M is a dog’s breakfast and the 44M-4 is just unpleasant.
Swirly Bokeh
This is probably the most important comparison, seeing how the swirly background compares between the four lens versions. Trying to find some foreground interest with the right background proved to be a challenge – the dog has no interest in sitting still for three lens changes. In the end I settled for the best available: not great but it demonstrates the behaviour I was looking for. For these shots the focus is on the grasses which are about 2.5m from the camera, with the background fairly distant. Aperture setting was wide open (f2).
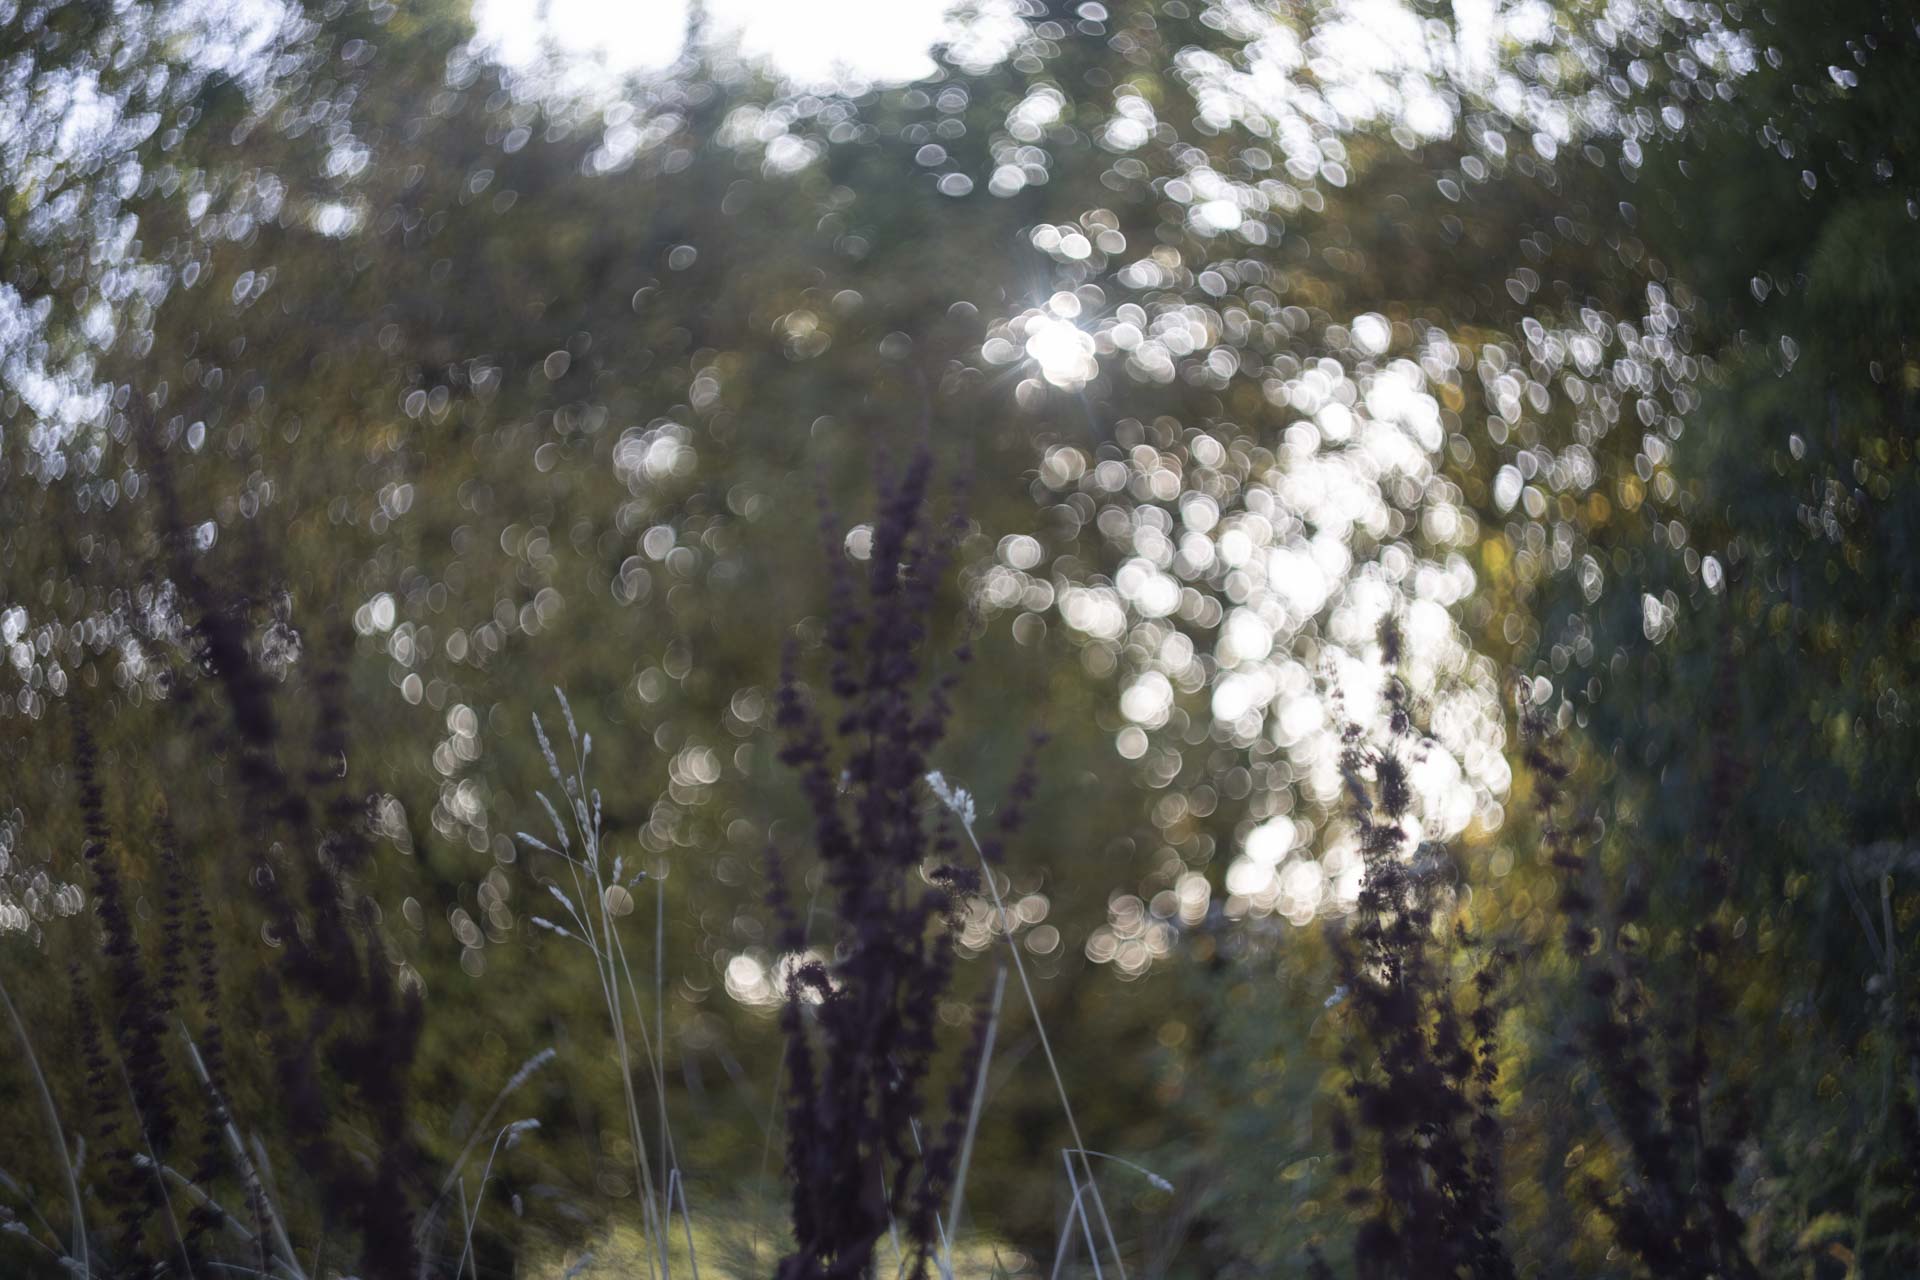


All four lenses produce an incridible swirl in the background. Which is best? As far as I can see there’s not a lot to choose between them. Perhaps the highlights at the edge of the frame with the 44 and 44M are slightly more elongated than those with the 44-2 and 44M-4, but any of the four of them look good enough for me.
Stopping the lenses down to f2.8 still gives a good swirly background, although the shape of the iris does start to become visible in the highlights near the centre of the frame. This is particularly noticable with the 44M-4 with its six bladed aperture.
Stopping down further the effect becomes progressively less pronounced, and by f8 there’s no swirl at all.
Conclusion
On a DSLR I found the 44 and 44-2 a bit awkward to focus due to the position of the focus ring being so close to the camera body. There’s also the worrying potential issue of the rear element fouling the mirror at infinity focus on a full frame Canon DSLR.
With my EOS-R mirrorless camera neither of these are a problem. The depth of the EF to RF converter moves the focus ring away from the camera body by about 20mm making it easier to access. It also keeps the rear element well away from the body, where there’s no mirror to foul anyway.
As far as hitting focus is concerned, I either zoomed the image in the EVF/back screen or used focus peaking to ensure I got things reasonably sharp.
And my favourite? I really like using the 44 and 44-2 because of their preset apertures, with the stop-down ring effectively giving a continuously variable aperture between wide open and what’s set on the outer aperture ring. But ultimately I like them all, and at some point they’ll all be in my camera bag when I’m out and about – but not all together again… An inconclusive end to a very long post!
2 thoughts on “Fun with 44’s: The Legendary Helios 44 Lens”