Way back in early 2020 when I made the lens coat for my Sigma 100-300mm f4 lens, I had my eye on the Canon 400mm f5.6 L-series lens and thought it looked like it shouldn’t be too challenging to make a coat for one of those. Well the good news from my perspective is that I’ve managed to acquire one: it’s a great lens – very sharp right across the frame – but it’s not exactly inconspicuous and I want to avoid the body getting damaged if I can. Time to make another coat!
As I said in my earlier post, the Canon 400mm looked like an easy lens coat project. This was mostly true, apart from one minor snag – the built-in retractable lens hood. With the section of lens barrel behind it wearing a full-time protective covering the hood wouldn’t be able to retract. My solution to this is a wrap-around sleeve fixed with velcro for the section behind the hood. This can be removed when the hood needs to be retracted to get the lens cap on and off, clean the front element, etc, but is simple to attach when the lens is being used.
So this becomes a four section coat, with three glued and stitched tubes similar to the ones for my earlier coats: the mount section, the focus ring and the lens hood, and the final section a wrap-around with velcro fixing.
Materials
- Neoprene sheet, camouflage pattern (or this one if you prefer leaf pattern)
- Neoprene rubber glue
- Velcro – 3/8″ (or 10mm) black sew on Velcro tape
- Thread – I used brown for overstitching the glued seams and black for the velcro.
Build
Measuring the width and diameter of each of the lens sections, and working out the lengths from the diamaeters, the dimensions I used for marking and cutting the neoprene for the three glued sections are (note: for these sections I knocked a few millimeters off the calculated lengths to ensure they were a reasonably tight fit on the lens.):
Lens hood: width 100mm, length 280mm,
Focus ring: width 48mm, length 230mm,
Mount section: width 66mm, length 205mm.
And for the wrap-around section: width 72mm, length 265 mm. (this gets trimmed after the velcro has been sewed on)
After cutting out all the pieces, the ends of the tubular sections were glued together with neoprene glue and allowed to cure overnight. Then the sewing … When I was winding thread onto the bobbin prior to stitching the first piece my old Singer sewing machine made a couple of strange noises and decided to reinvent itself as a smoke machine. There doesn’t appear to be any outward damage, but I’ve no idea whether it’s fixable – that’s something to investigate later.
In the meantime I didn’t want to get held up waiting for a solution to the sewing machine problem, so I decided to hand stitch the seams. Last time round I started doing this and gave up in favour of machine sewing, but since that wasn’t an option I had to persevere and to be honest the process wasn’t too painful or time consuming.
The glued sections are stitched with brown thread which hides a lot of the unevenness, and drawing guide lines either side of the joins with marking chalk helped keep things relatively straight.
For the wrap around section, the loop-side of the velcro was stapled to one end of the neoprene strip (on the camo side) to keep it in place while it was sewed on. Once I’d sewed all round the velcro the staples were removed. The hook-side of the velrco was then stuck to the loop-side and the strip wrapped round the lens body, pulled tight and the correct position marked on the inside (black side) of the neoprene. The hook velcro was then stapled in place and stitched on, after which the staples were removed. The section was then attached to the lens to make sure it was a good fit before cutting off the excess flap of neoprene.
The Finished Product
On the lens, with the lens hood extended, the coat looks like this:

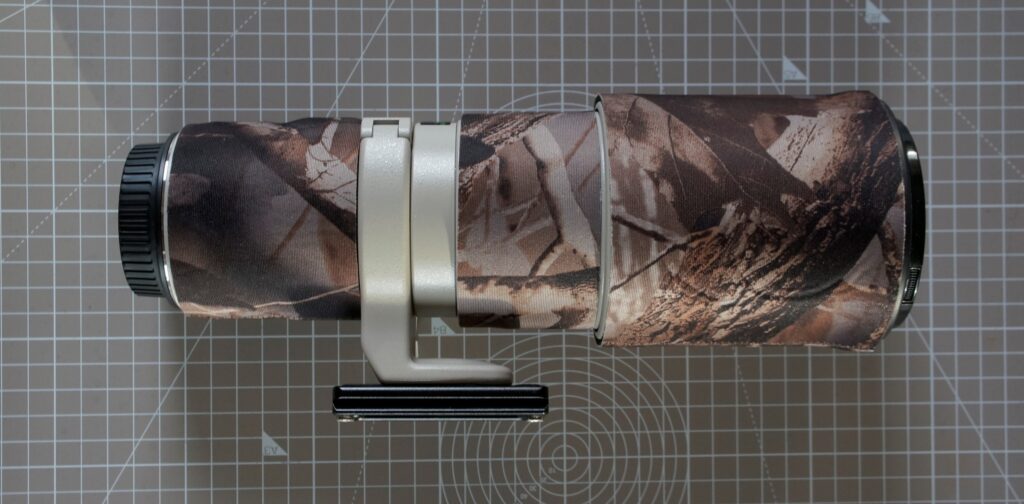
And with the wrap-around section removed and the lens hood retracted:

Since I had to buy some sew-on velcro for this project, and get the sewing machine out, it seemed like a good opportunity to tackle another camouflage project I’d been meaning to get round to for a while: covering the top leg sections of my heavyweight wildlife shooting tripod. However, with the demise of my sewing machine this has been put on hold – the velcro section for the lens is about 70mm long and it took a while to sew both parts of the velcro to it. For the tripod each of the three covers is about 370mm long, so that’s definitely not a hand stitching job for somebody with my sewing skills. Wrap around camouflage tape will do fine for now.
One thought on “More Adventures in Neoprene”